Tag: iphone repair

  • iPhone 18 Pro Teardown: What Changed Inside and How Does It Affect Repairability

    iPhone 18 Pro Teardown: What Changed Inside and How Does It Affect Repairability

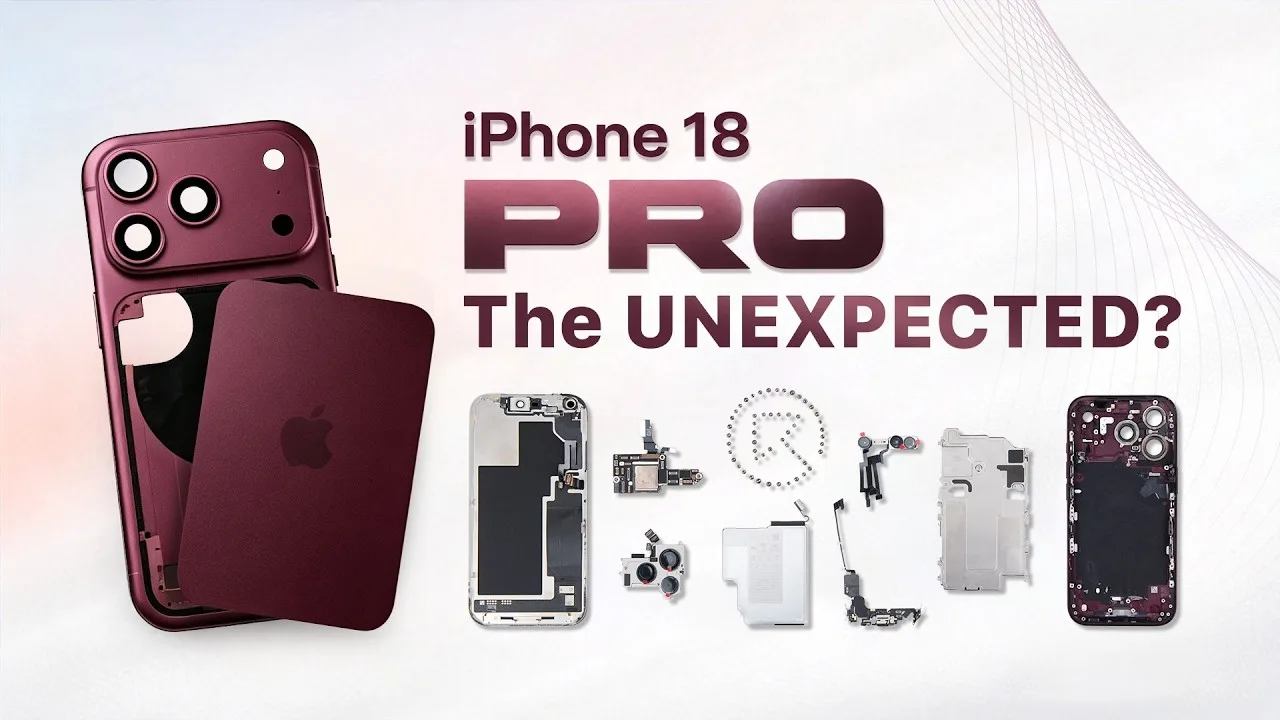
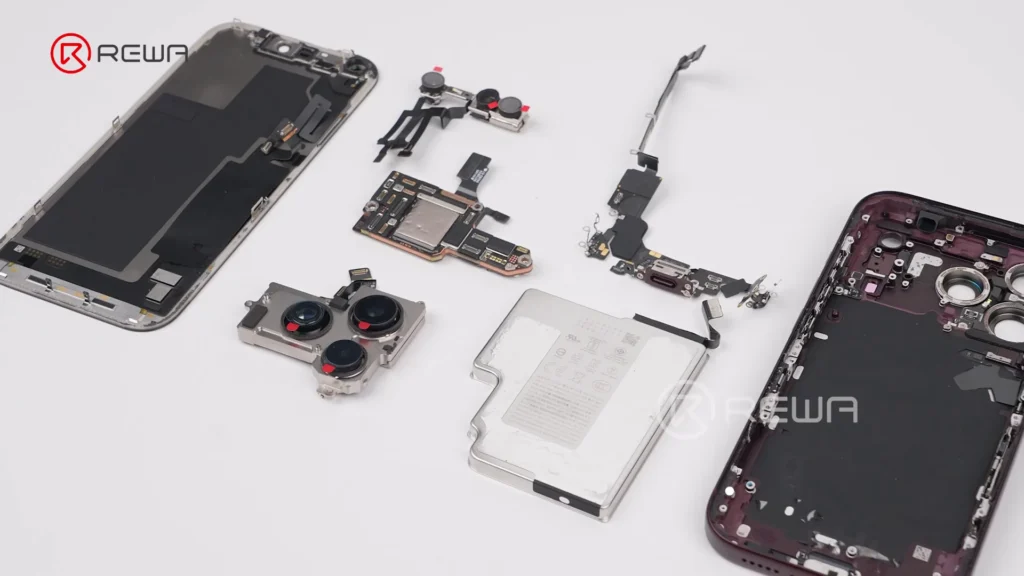
    The iPhone 18 Pro brings several significant changes beneath its familiar exterior. From a smaller Dynamic Island and a new under-display infrared camera to a dramatically larger vapor chamber and a redesigned motherboard layout, Apple has changed more than just the phone’s appearance.

    In this full teardown by REWA Lab, we dive deep into the internal structural changes and analyze what these updates mean for third-party repair shops and aftermarket component manufacturers.

    Step-by-Step Disassembly Process

    Opening the iPhone 18 Pro requires specialized repair tools and a cautious approach to avoid damaging internal flexes and sensors. Standard safety and prep steps are as follows:

    Preparation Before Teardown: Power off the device and remove the bottom screws with the Pentalobe screwdriver.
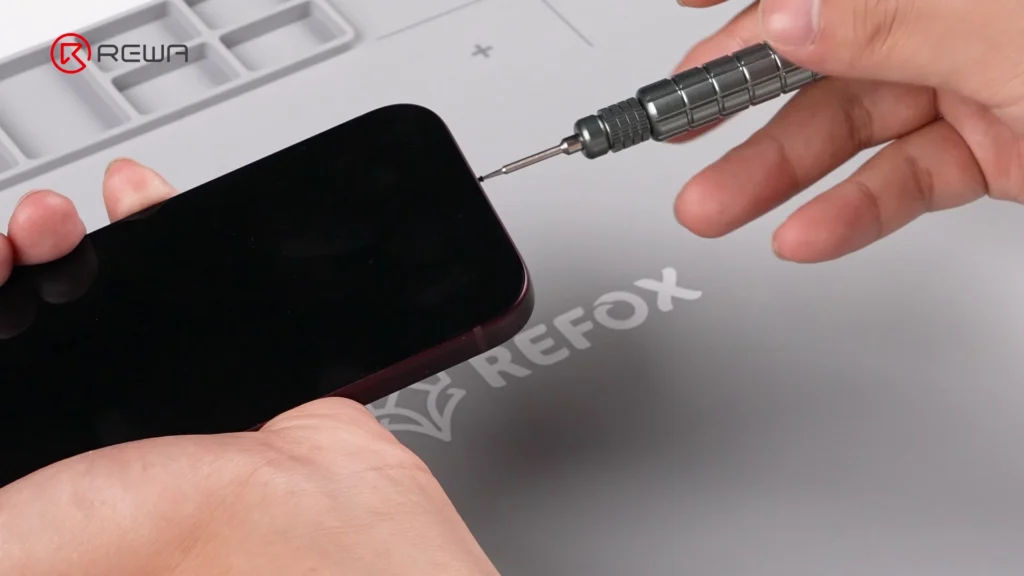
    Removing the bottom screw of an iPhone using a precision Pentalobe screwdriver

    Screen Removal: Heat the screen to soften the perimeter waterproof adhesive. Use an opening tool with suction cup and isopropyl alcohol to gently slice through the seal with an opening pick.

    Camera Protection: Cover the front camera module with protective sponge stickers to prevent dust or scratches.

    Bracket & Flex Cable Disconnection: Unscrew and remove the battery and display connector bracket. Disconnect the battery flex cable, display cable, and front sensor cable to free the screen.

    Vapor Chamber & Cameras: Unscrew the vapor chamber using a 4IP screwdriver. Disconnect and remove the front / rear camera modules.
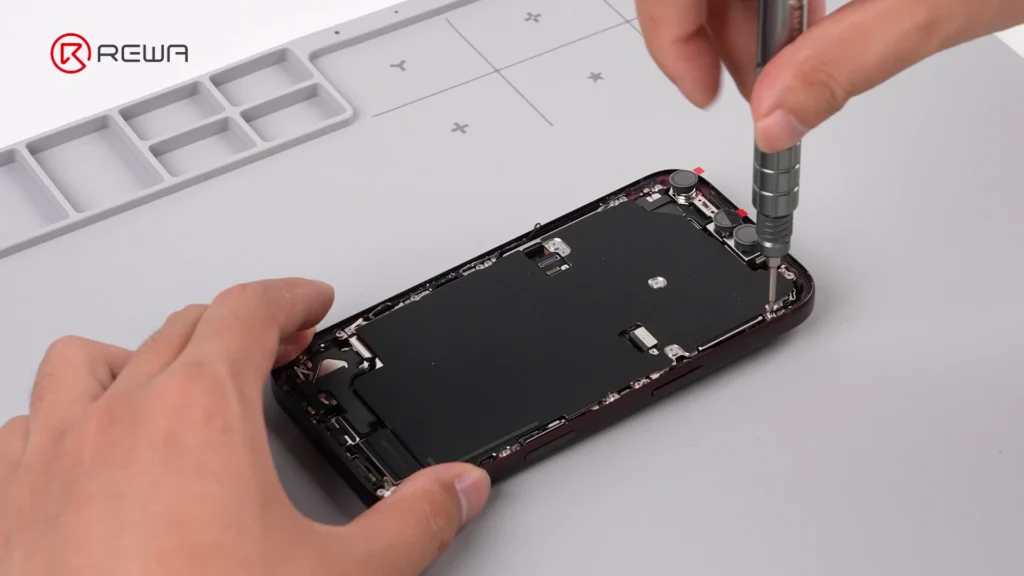
    using a screwdriver to open iPhone 18 Pro for teardown

    Motherboard & Peripheral Removal: Unscrew and flip over the motherboard to disconnect the wireless charging coil. Remove flashlight, LiDAR, SIM tray, SIM card reader, bottom speaker, charging port, Taptic Engine, and microphone in sequence.
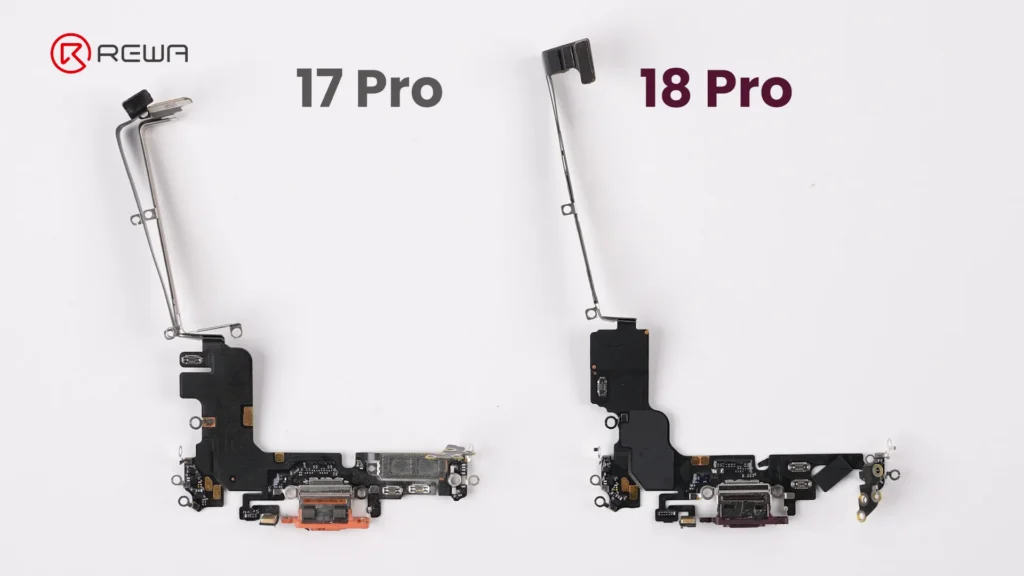
    iphone 18 pro teardown what changed inside how does it affect 3

    Battery Debonding: Apply a 9V DC voltage between the silver battery tab (positive probe) and the vapor chamber (negative probe) to electronically deactivate the adhesive, allowing easy battery removal.
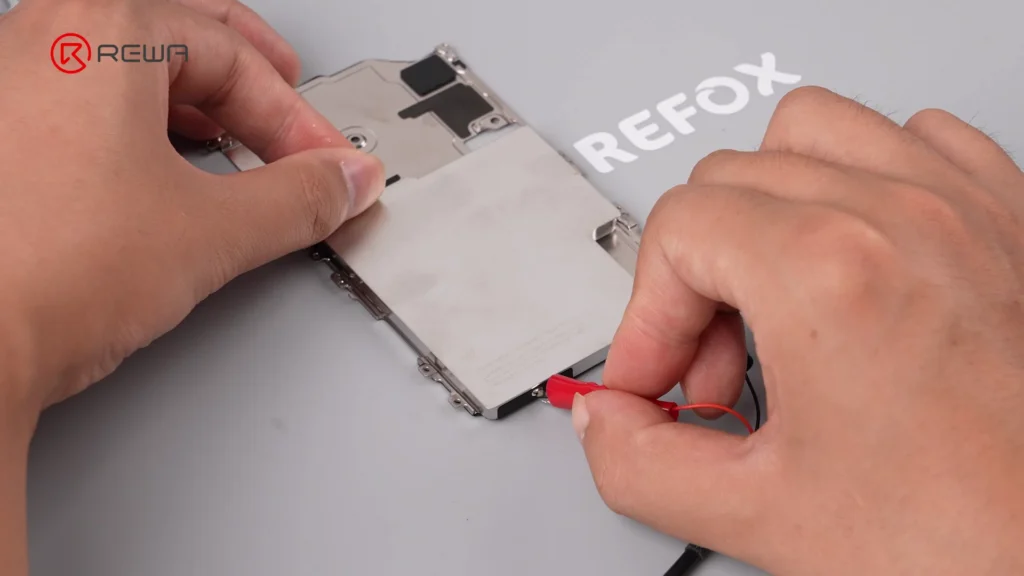
    iphone 18 pro teardown what changed inside how does it affect 4

    Display & Dynamic Island: Under-Display Infrared Tech

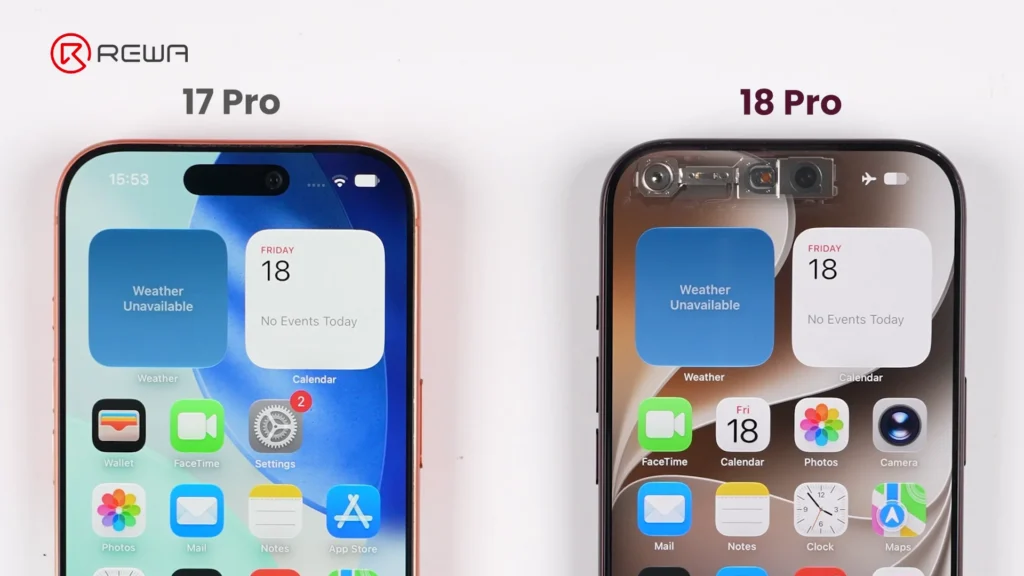
    Apple’s smaller Dynamic Island introduces a more complex under-display optical structure, creating new challenges for display refurbishment. This shrink is achieved by relocating the infrared camera under the display assembly and positioning it near the screen corner.
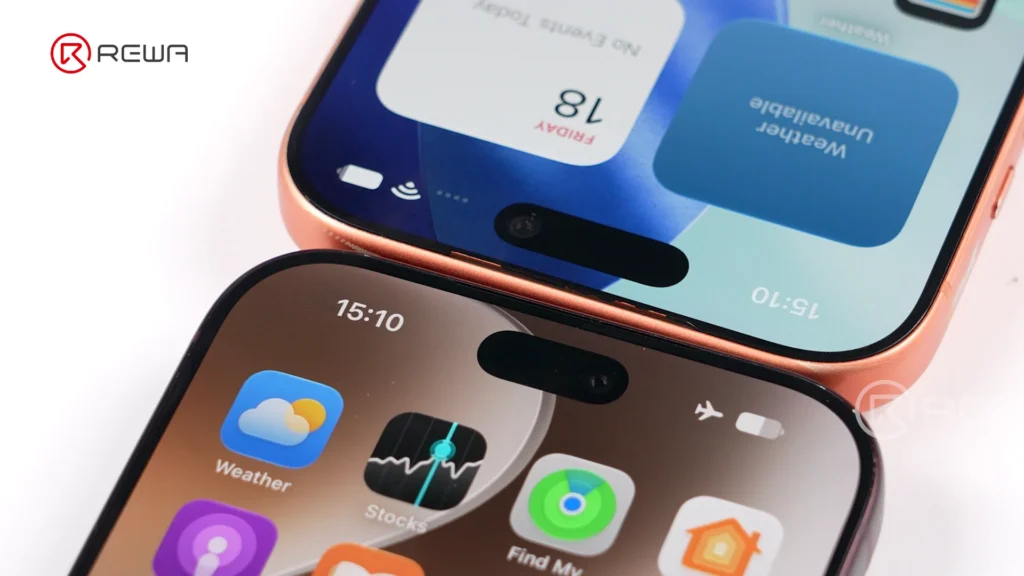
    iphone 18 pro teardown what changed inside how does it affect 5
    iphone 18 pro teardown what changed inside how does it affect 6

    Key display architecture updates include:

    Adjusted Pixel Matrix: The display above the infrared camera features a modified pixel density and arrangement to allow infrared light transmission for Face ID functionality.

    iphone 18 pro teardown what changed inside how does it affect 7

    Unfixed Flex Cable: The display flex cable is no longer secured with heavy adhesive, making screen separation cleaner during repair and refurbishment.

    Aftermarket Challenge: Third-party display manufacturers will face higher precision requirements to replicate the light-transmitting pixel window for Face ID functionality.

    Motherboard Architecture: Higher Difficulty for Micro-Soldering

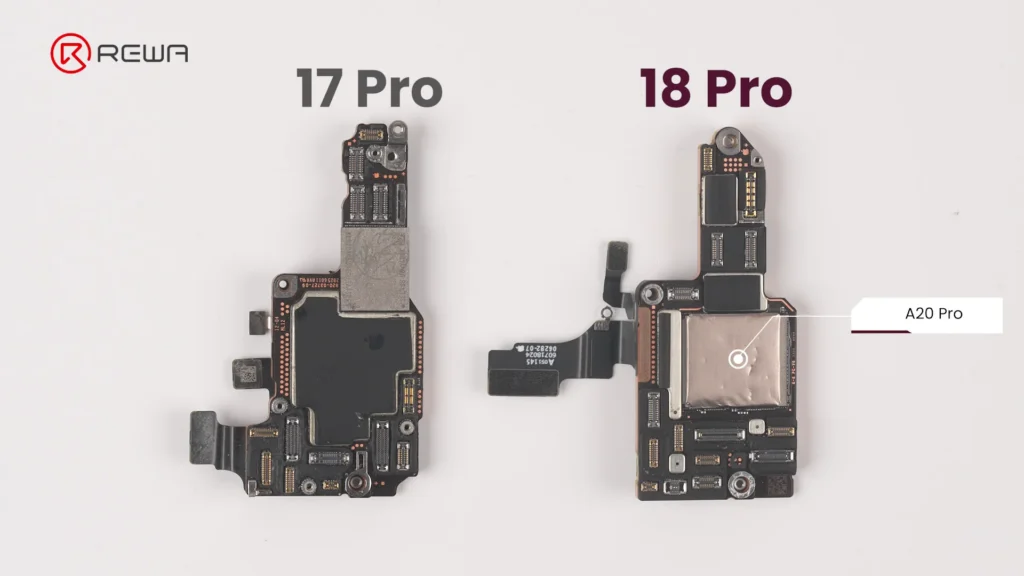
    The updated motherboard layout places crucial chips in vulnerable locations while sandwiching NAND and power IC between layers. For micro-soldering technicians, the iPhone 18 Pro motherboard presents an elevated level of complexity.
    iphone 18 pro teardown what changed inside how does it affect 8

    Apple has reorganized chip placement and shielding:

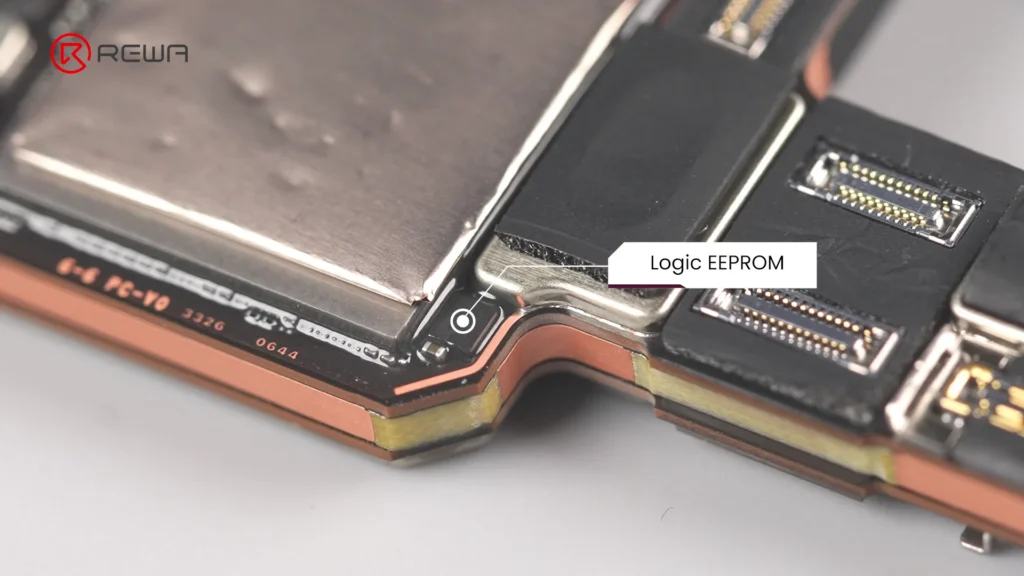
    Exposed Logic EEPROM: The Logic EEPROM chip on the board surface lacks a protective metal shield, leaving it significantly more susceptible to physical damage and technician error.
    iphone 18 pro teardown what changed inside how does it affect 9

    Layered Sandwich Design: The NAND storage chip and Power IC are sandwiched inside the multi-layer PCB structure. Replacing or repairing these components requires demanding motherboard desoldering and reballing.

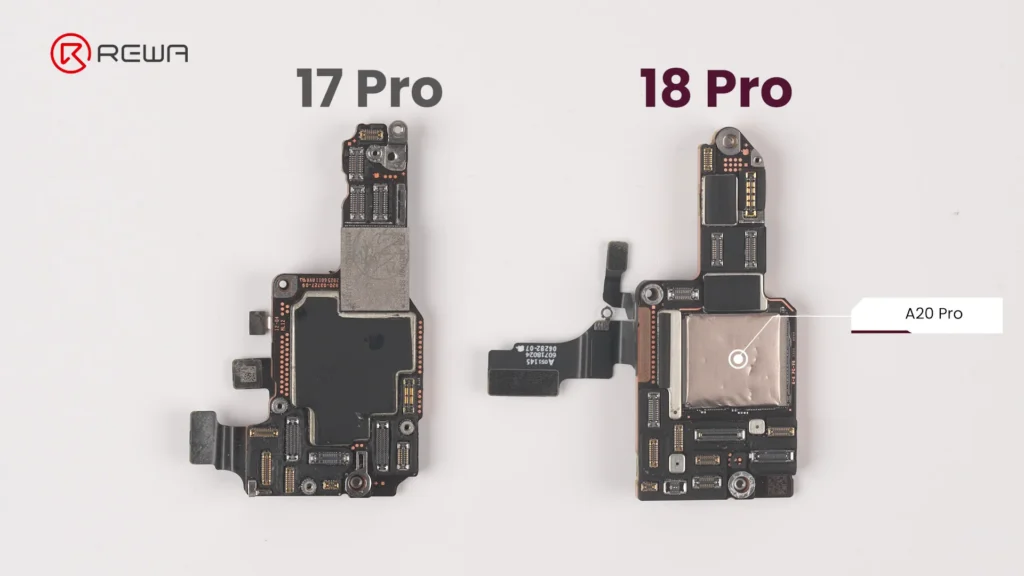
    Relocated A20 Pro Chip: The main processor sits directly on the motherboard surface, and in direct contact with the vapor chamber for substantial improvement in thermal performance.
    iphone 18 pro teardown what changed inside how does it affect 10

    Upgraded Camera Modules

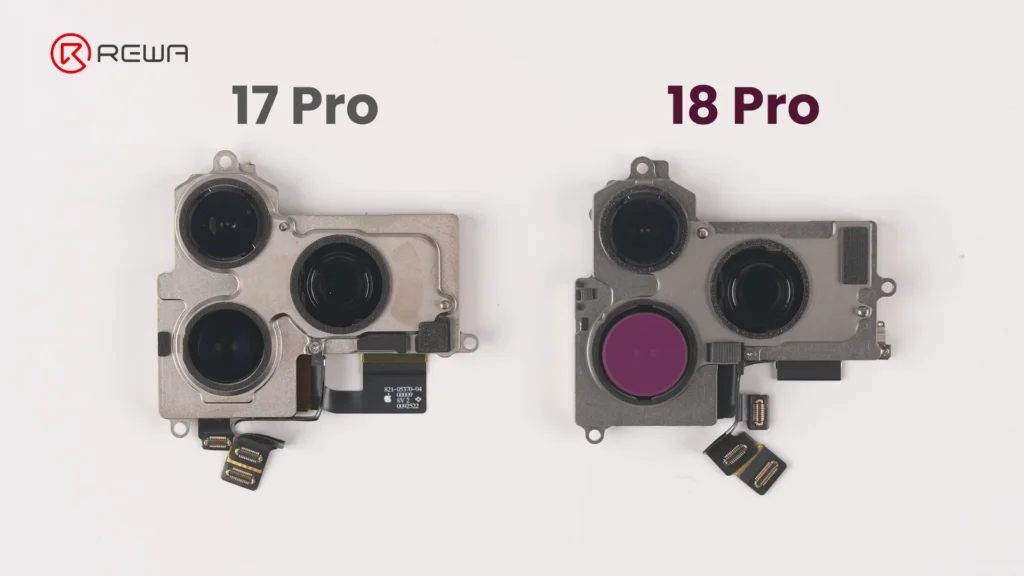
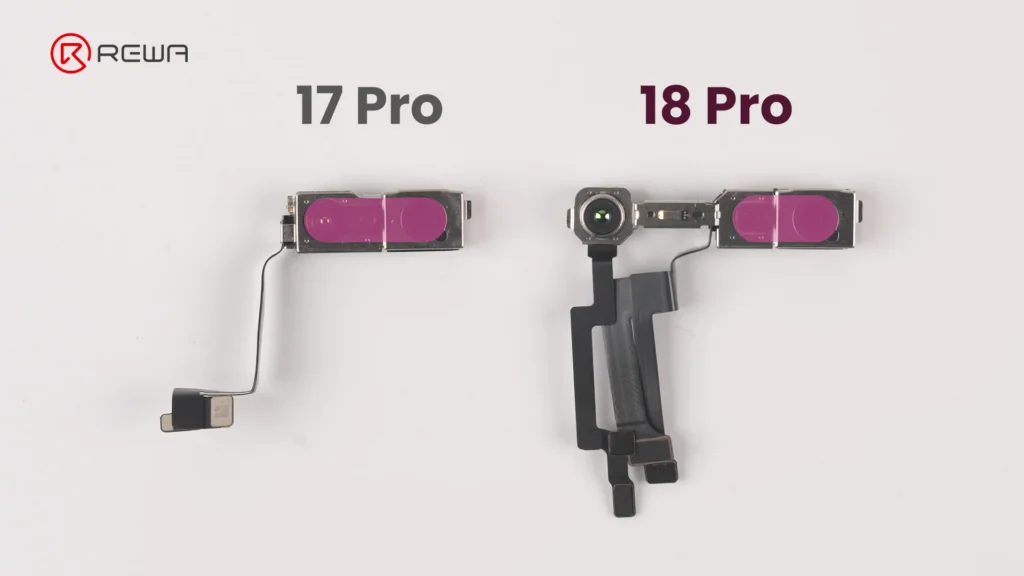
    The iPhone 18 Pro’s camera modules feature noticeable changes in mechanical design, module size, and cable layout.

    Fusion Main Camera: The rear camera module features a variable aperture for greater control over depth of field.
    iphone 18 pro teardown what changed inside how does it affect 11

    Separated Infrared Sensor: The front camera and under-display infrared camera are connected via three separate flex cables, bridged across a wider distance to facilitate the shrunken Dynamic Island.
    iphone 18 pro teardown what changed inside how does it affect 12

    Thermal Management & Battery Changes

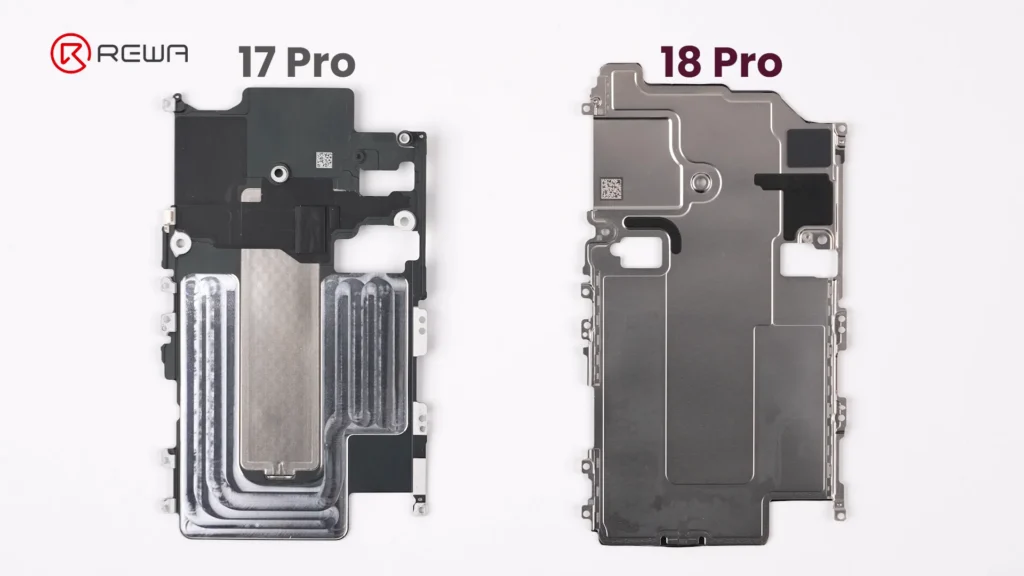
    Vapor chamber on the iPhone 18 Pro receives its largest redesign in years. Apple has integrated a significantly larger vapor chamber, with three times the surface area of the one used in the iPhone 17 Pro.
    iphone 18 pro teardown what changed inside how does it affect 13

    Simply Put:

    A vapor chamber is a flat, sealed metal enclosure containing a small amount of liquid. When the chips heat up, the liquid absorbs heat and evaporates. The vapor then spreads through the chamber, transferring heat to cooler areas where it condenses back into liquid. This helps the phone maintain stable performance under sustained workloads.

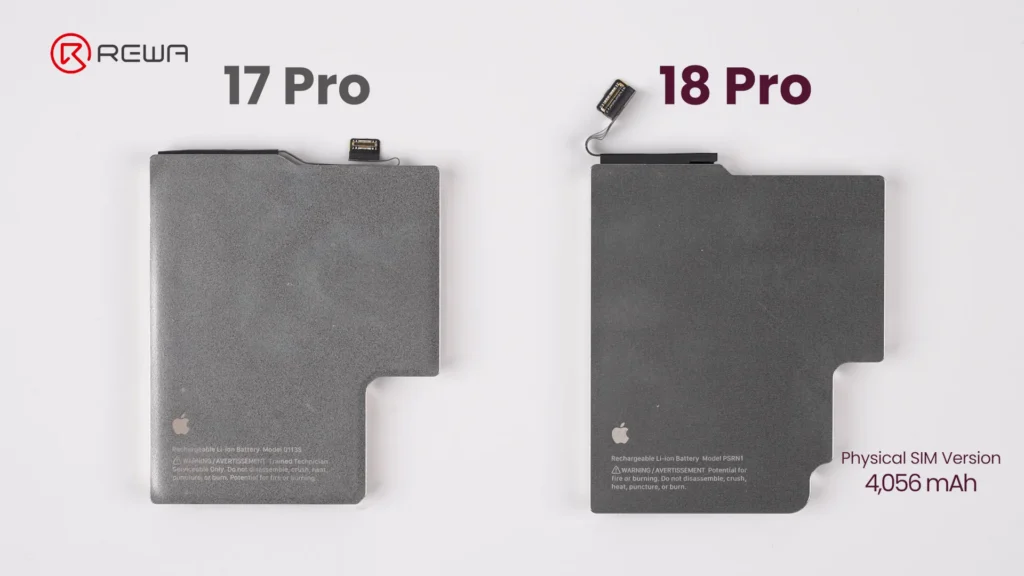
    The battery capacity of iPhone 18 Pro is slightly bigger than that on iPhone 17 Pro. In physical SIM version, it packs 4,056mAh, achieving about 1.7% increase over previous generation. Apple officially confirms that the redesigned battery architecture and charging system enable faster charging, reaching 50% in approximately 15 minutes.
    iphone 18 pro teardown what changed inside how does it affect 14

    Repair Difficulty Assessment: Pros & Cons

    A concise summary of what makes repairing the iPhone 18 Pro easier or harder for repair professionals.

    Component Changes Made Repair Difficulty
    Screen
    • Smaller Dynamic Island
    • Under-display infrared camera
    • Display flex cable not fixed with adhesive
    Easy
    Battery
    • Larger capacity: 4,056mAh (SIM tray version)
    • Larger connector
    • Multi-layer cable
    Easy
    Front Camera Module
    • Infrared camera moved to the corner
    • Three separate cables
    Very Easy
    Rear Camera Module
    • Larger Fusion Main Camera
    • Cable layout changed
    Hard
    Motherboard
    • A20 Pro chip on the surface
    • Logic EEPROM chip without a shield
    • NAND and Power IC sandwiched inside
    Very Hard

    Frequently Asked Questions (FAQs)

    Why is iPhone 18 Pro motherboard repair more difficult?

    The main reason is the new layered motherboard architecture. NAND storage and the power IC are positioned between PCB layers, meaning technicians need to separate the board layers to access them. This increases the complexity, heat exposure, labor, and risk involved in component-level repair.

    Why is the Dynamic Island smaller on the iPhone 18 Pro?

    The infrared camera used for Face ID has been moved under the display and toward the corner. The display uses a modified pixel arrangement in this area to allow infrared light to pass through. This allows Apple to reduce the size of the visible Dynamic Island.

    How big is the iPhone 18 Pro battery?

    The iPhone 18 Pro shown in the REWA Lab teardown is the physical-SIM version and has a 4,056mAh battery, approximately 1.7% higher than the iPhone 17 Pro. Battery capacity varies by regional configuration; in eSIM-only version, the iPhone 18 Pro has a 4,288mAh battery.

    How much larger is the iPhone 18 Pro vapor chamber?

    iPhone 18 Pro vapor chamber has three times the surface area of the vapor chamber in the iPhone 17 Pro. Apple says the redesigned thermal system enables up to 40% better sustained performance compared with the previous generation.

    What is the biggest repair challenge revealed by REWA Lab’s iPhone 18 Pro teardown?

    For board-level technicians, the layered motherboard architecture is one of the most significant challenges because it complicates access to NAND and power-management components. For aftermarket parts manufacturers, the new under-display infrared camera arrangement creates another major challenge because display structure, optical transmission, and Face ID compatibility must all work together.

    Did Apple make major changes to the iPhone 18 Pro’s frame and back cover?

    No. The iPhone 18 Pro retains a largely similar frame and back cover structure to the iPhone 17 Pro. The back cover uses a more color-matched aluminum and glass design in iPhone 18 Pro.

    Conclusion

    The iPhone 18 Pro showcases impressive internal engineering, highlighted by under-display Face ID technology, triple-sized vapor chamber, and larger variable-aperture main camera.
    iphone 18 pro teardown what changed inside how does it affect 15

    However, for the independent repair industry, these advancements come with obvious challenges: motherboard layering makes micro-soldering more demanding, and screen replacement requires precise technical alignment and careful handling to ensure proper Face ID functionality.

    As phone architectures become more complex, having high-grade repair tools, reliable replacement parts, and advanced technical training is essential, please contact us for OEM/aftermarket replacement parts, professional repair tools, and step-by-step technical guides.
  • Fix iPhone Unknown Part Message Using Diagnostic-Compatible Parts

    Fix iPhone Unknown Part Message Using Diagnostic-Compatible Parts

    Apple’s Repair Assistant has transformed the way iPhone repairs are performed. Today, simply installing an aftermarket display or battery isn’t enough. To avoid the iPhone unknown part message, the replacement component must also be compatible with Apple’s Repair Assistant and successfully pass the post-repair diagnostic process. Using diagnostic-compatible parts helps ensure a seamless repair experience while preventing warning messages that can affect user confidence.

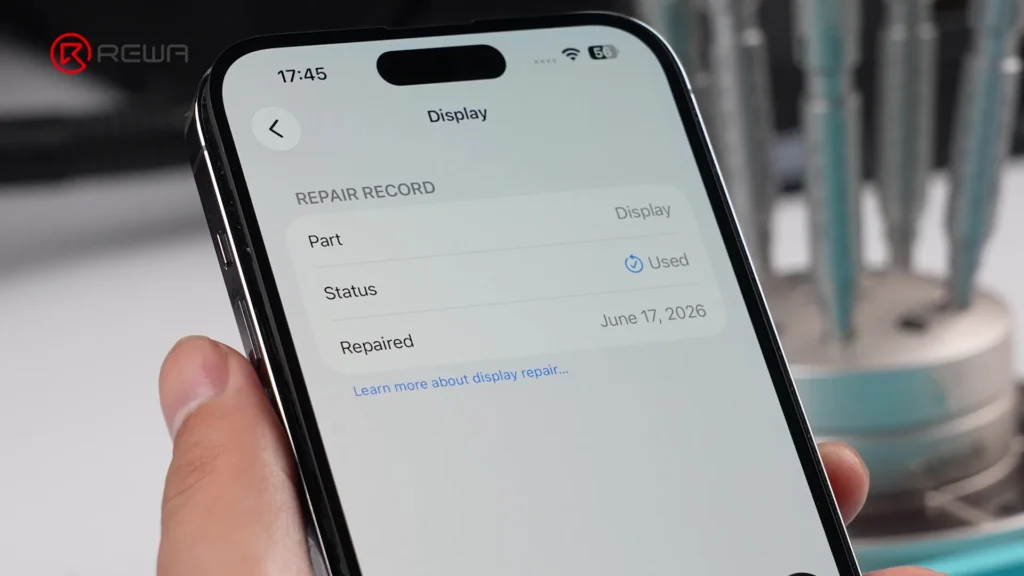
    iPhone screen showing a Repair Record for a display with a status of Used


    As a result, diagnostic-compatible screens and batteries have quickly skyrocketed in the mobile repair industry in 2025. They promise a much simpler installation process while avoiding the iPhone Unknown Part message that traditional third-party parts often trigger.

    In this guide, REWA will break down the technology behind diagnostic-compatible parts in plain English, discuss their advantages and limitations, and help you decide whether they’re the right choice for your repair business.

    What Are iPhone Diagnostic-Compatible Parts?

    A diagnostic-compatible part is an aftermarket replacement component engineered to work seamlessly with Apple’s Repair Assistant. After installation, it can successfully complete the pairing and diagnostic process, helping prevent the iPhone unknown part message from appearing. This allows users to enjoy a smoother repair experience while maintaining proper part recognition and system functionality.

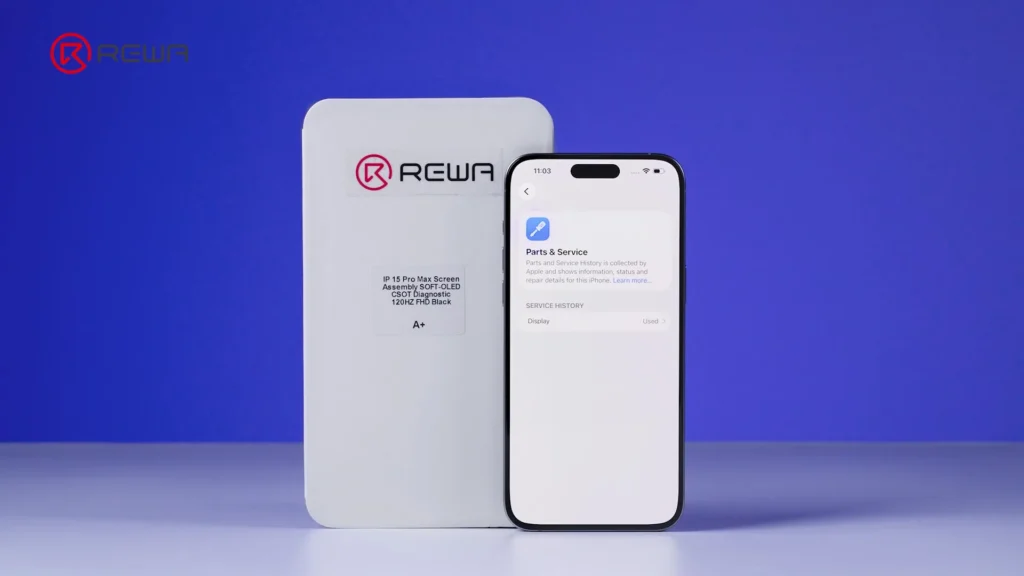
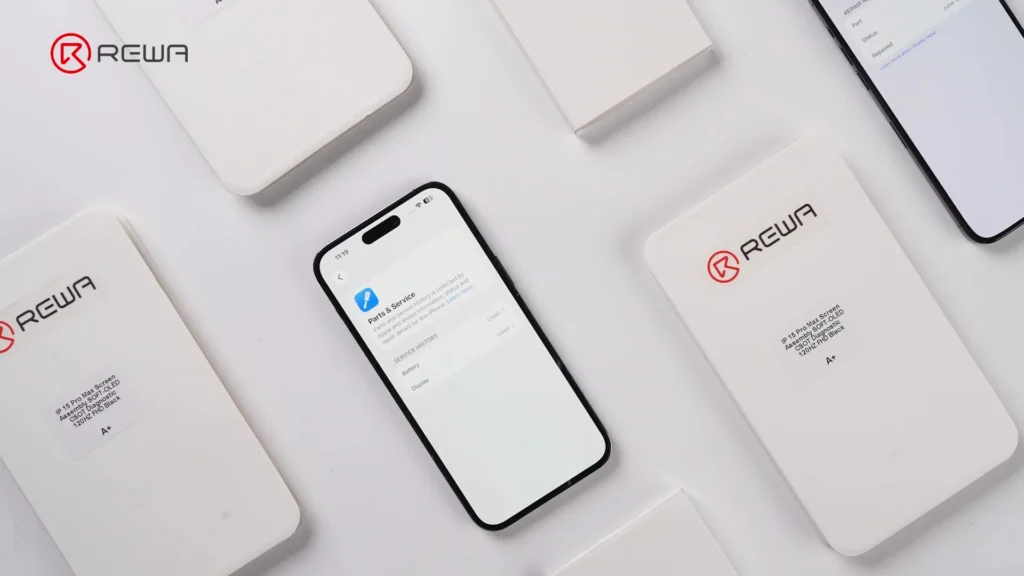
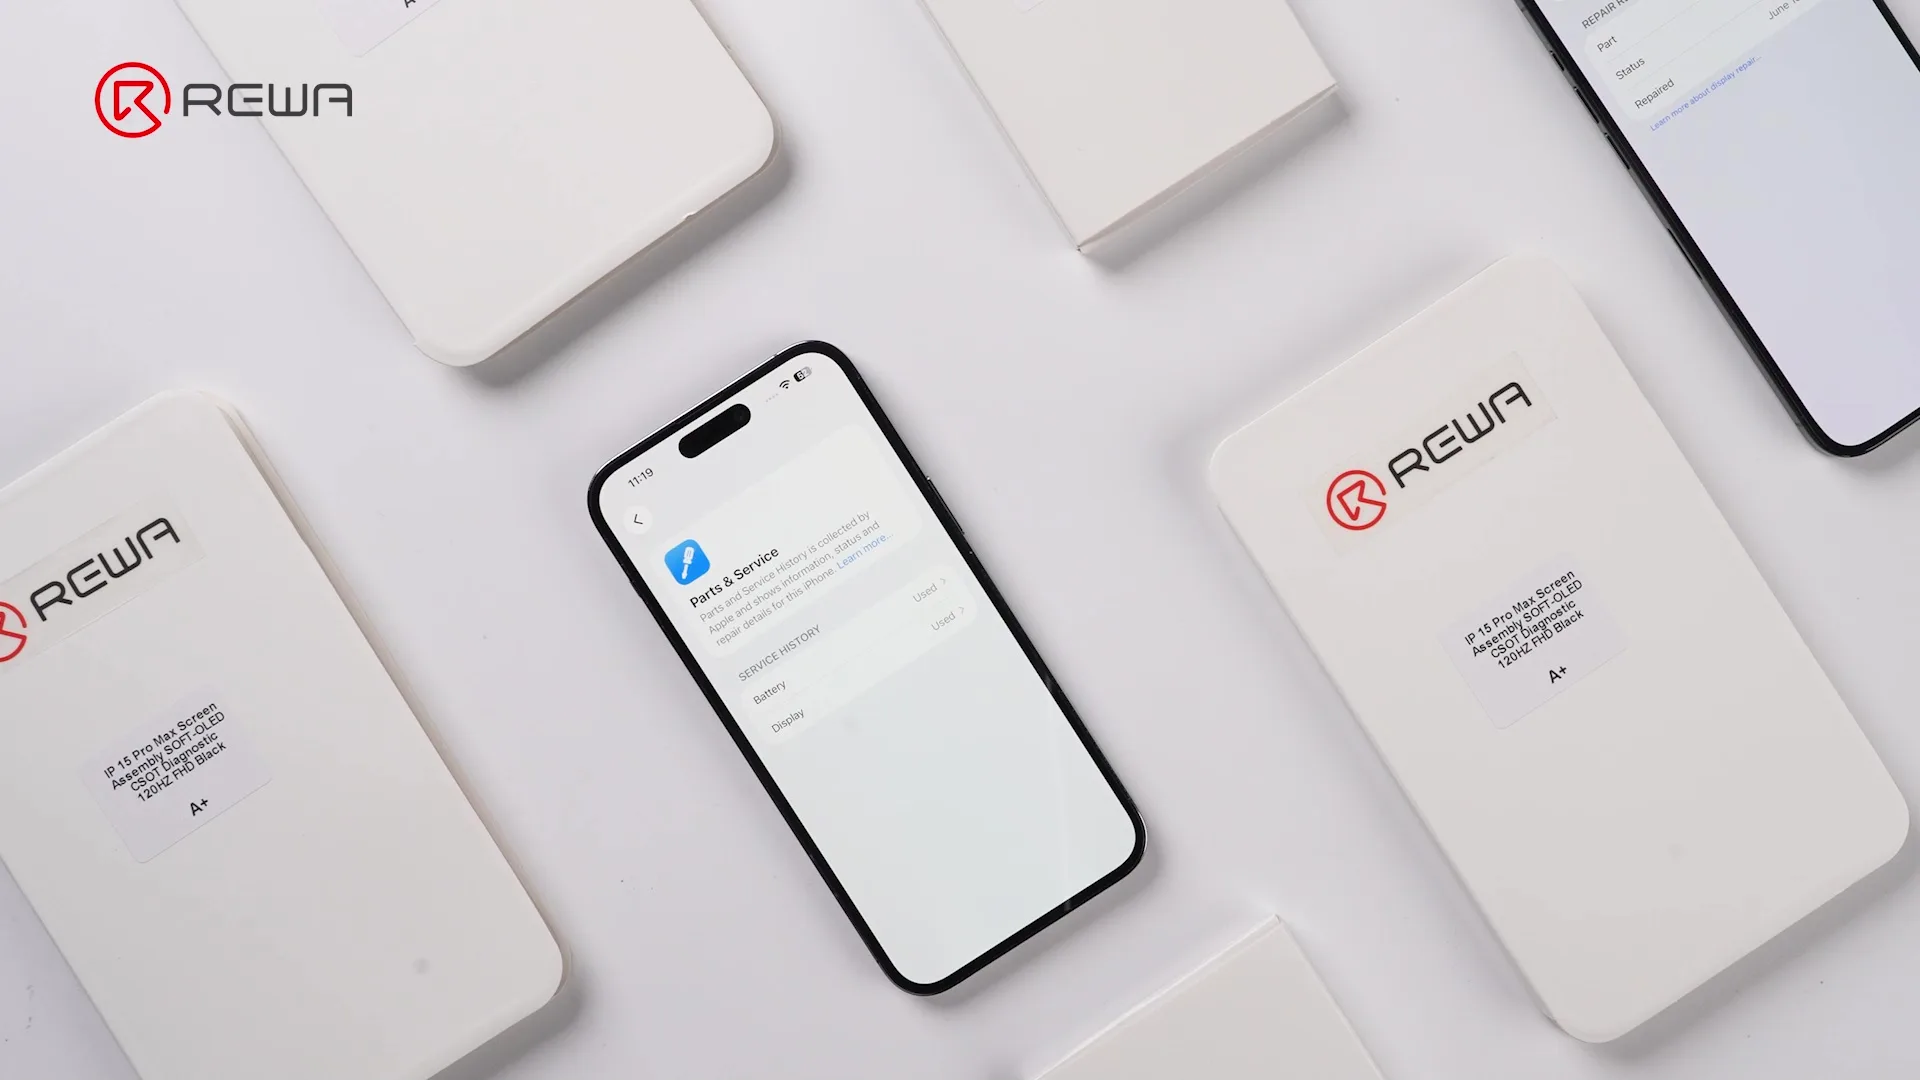
    REWA iPhone 15 Pro Max diagnostic screen (solve unknown part message) packaging and an iPhone showing a recognized display in service history

    Normally, third-party screens and batteries are not recognized as genuine paired components by iOS. As a result, users may see:

    • “Unknown Part” notifications
    • Limited functionality after replacement
    • Failure during Apple’s Parts Calibration process

    Diagnostic-compatible parts are engineered specifically to overcome these problems, allowing many repairs to be completed without performing risky IC chip transplantation.

    Simply put:

    Repair Assistant is Apple’s software calibration system introduced for newer iPhones. After replacing certain components, technicians can run Repair Assistant to verify and calibrate the installed parts.
    How Does a Diagnostic-Compatible Screen Work?

    The technology behind diagnostic-compatible displays may sound complicated at first, but the basic concept is surprisingly straightforward. Let’s break it down step by step. The secret isn’t the OLED panel itself. Instead, the key component is the OEM pulled touch IC.
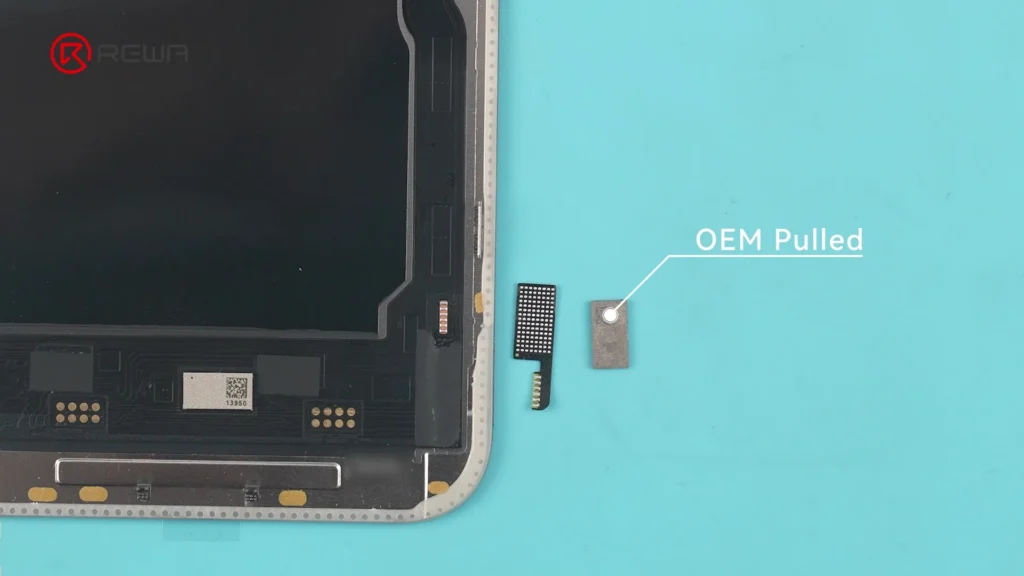
    A small rectangular chip labeled OEM Pulled next to an iPhone screen assembly
    An OEM pulled IC is an original Apple chip removed from another genuine iPhone screen.

    Since Apple’s encrypted calibration information is stored inside the touch IC, manufacturers transplant an original touch IC onto an aftermarket OLED display. This allows the screen to present itself to the system in a way that enables Repair Assistant to complete successfully.

    The whole calibration process is like this:

    • Harvest an original touch IC from a donor screen.
    • Solder the IC onto an aftermarket OLED display.
    • Install the screen.
    • Run Apple’s Repair Assistant.
    • Complete Parts Calibration.

    Why is the Front Sensor Flex Important?

    There’s another important detail that many technicians overlook, especially on newer iPhones. After Parts Calibration, the front sensor flex cable becomes critical.

    For iPhone 14 Series and earlier, the repair is relatively forgiving. As long as a compatible front sensor flex cable is installed, the screen can usually pass Repair Assistant.

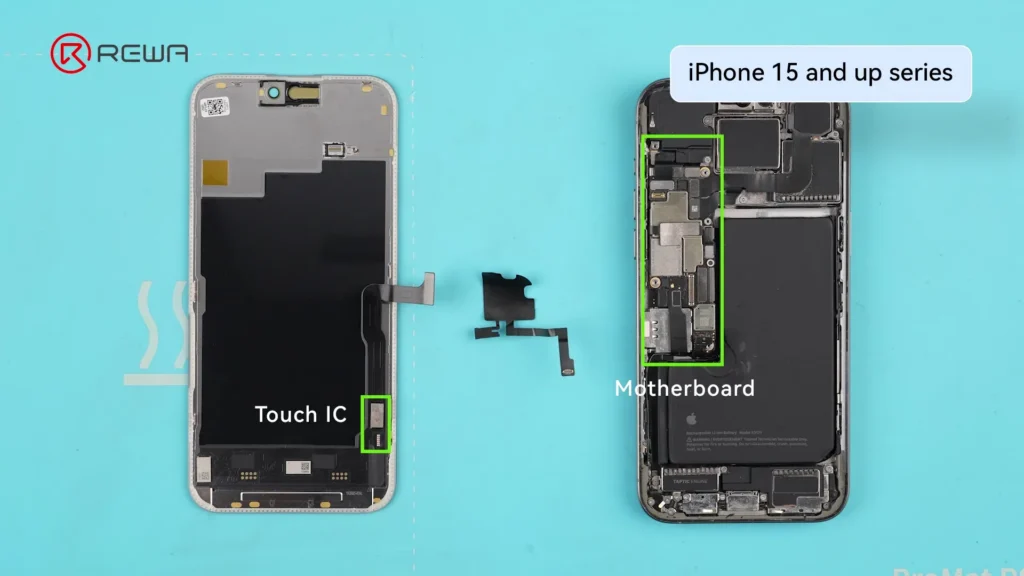
    For iPhone 15 Series and newer, requirements become much stricter. The front sensor flex must be either the original flex paired with the motherboard, or perfectly matched to the touch IC installed on the replacement screen. Otherwise, the calibration may fail even if the screen itself is diagnostic-compatible.

    iPhone 15 series components highlighting the screen's Touch IC, the front sensor flex, and the motherboard

    How Does a Diagnostic-Compatible Battery Work?

    The same design philosophy also applies to batteries. Instead of relying on the battery cell itself, the key component is the Battery Management System (BMS) board.

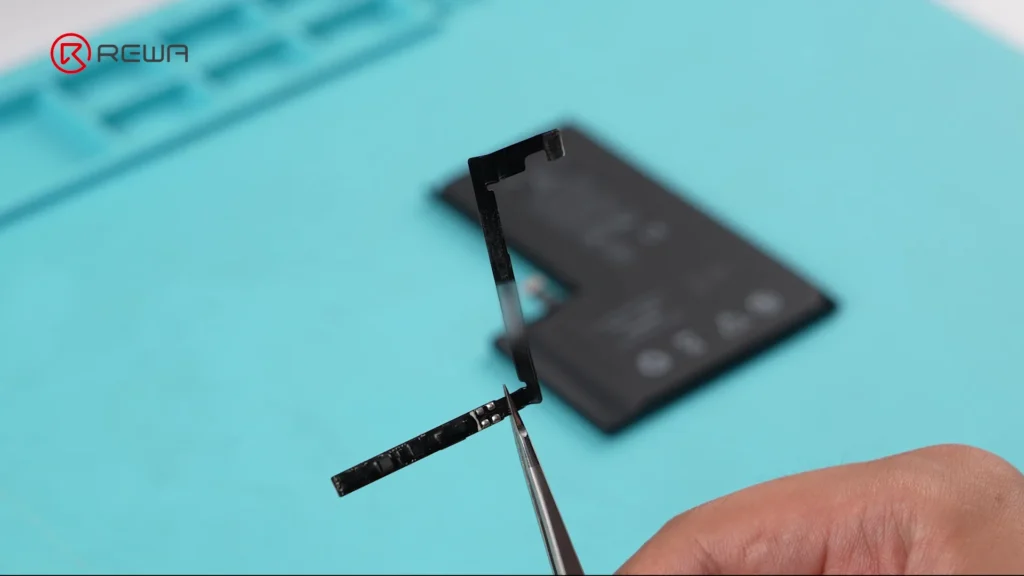
    A thin, black L-shaped Battery Management System (BMS) board held with tweezers
    A small circuit board attached to every iPhone battery.

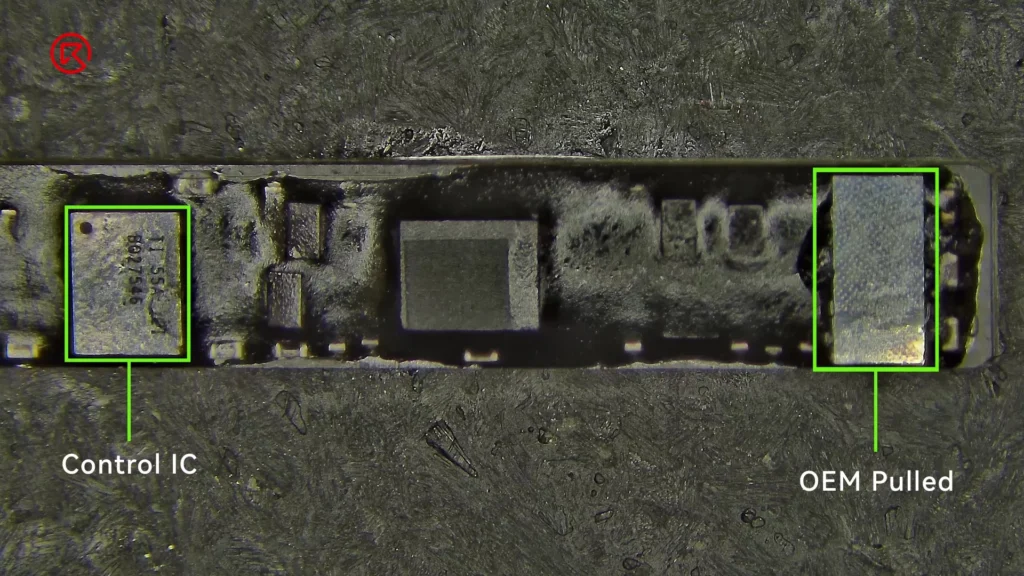
    The BMS board controls functions including charging, battery protection, power management, battery health reporting and fuel gauging. Diagnostic-compatible battery manufacturers replace the traditional aftermarket BMS board with:

    • an OEM pulled authentication IC
    • a control IC for battery management
    BMS board showing the Control IC and OEM Pulled authentication IC

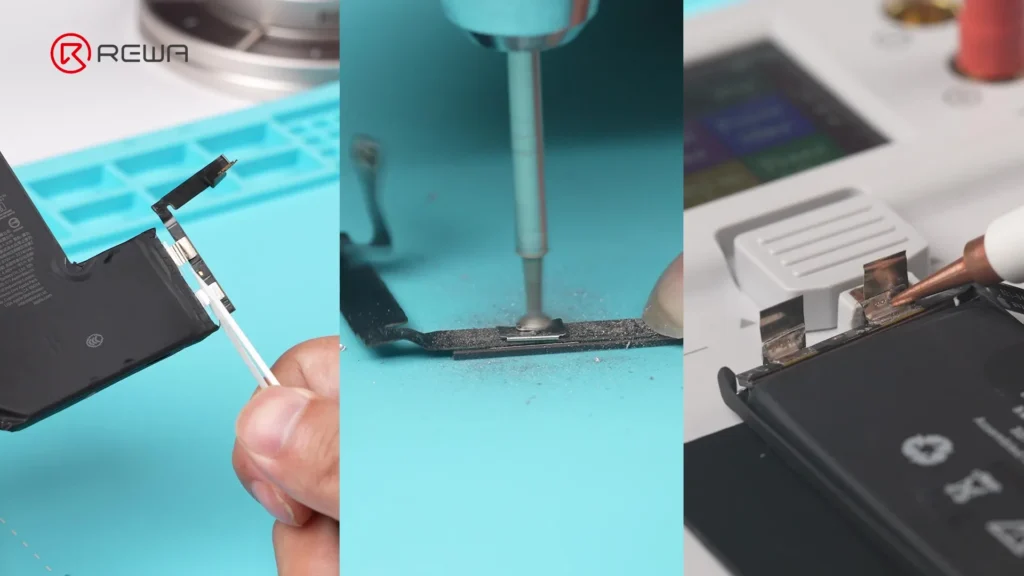
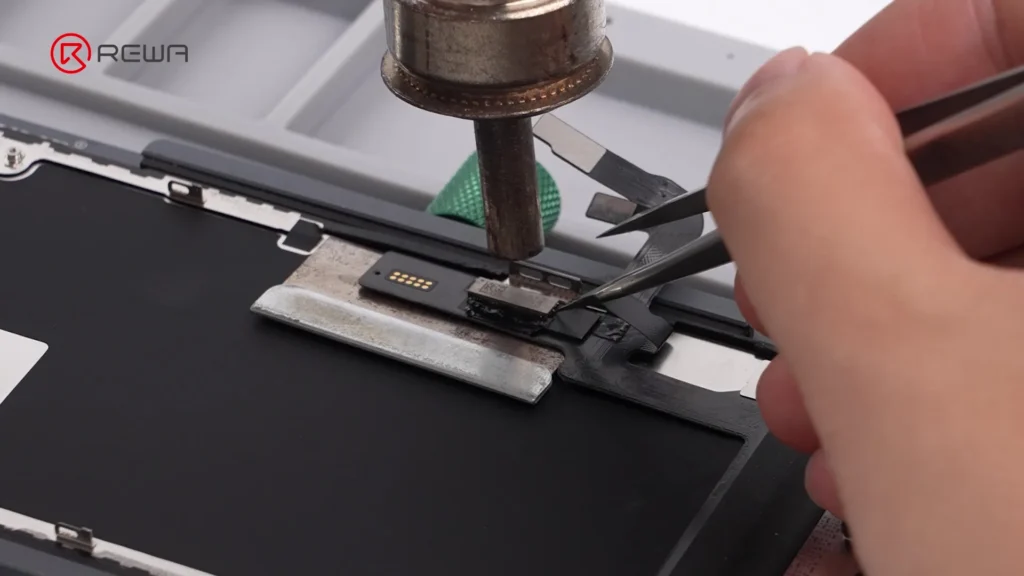
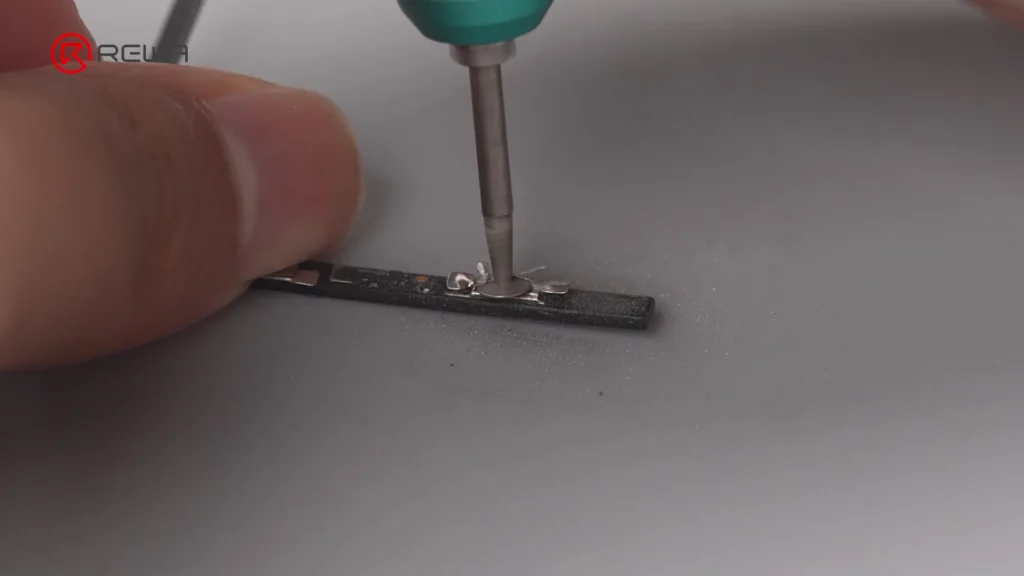
    After spot welding this BMS board onto a new battery cell, the battery can successfully complete Repair Assistant while still operating like a normal replacement battery.

    A three-panel sequence showing the preparation and spot welding of a BMS board onto a new battery cell

    Quick tip:

    Fuel Gauging refers to the system that calculates the battery percentage displayed on your iPhone.

    Advantages of Diagnostic-Compatible Parts

    Diagnostic-compatible parts have become popular because they solve several long-standing repair challenges. Here’s why many repair shops are paying attention.

    1. Lower Risk During Installation

    Traditional solutions often require screen IC transplantation, battery BMS transplantation and precision microsoldering.

    These procedures require expensive equipment and highly experienced technicians. Diagnostic-compatible parts significantly reduce the chance of technician-induced failures.

    2. Faster Repair Turnaround

    Without chip swapping, repairs become much quicker. For businesses, faster turnaround often means higher profitability.

    Repair shops can:

    • Complete more repairs each day
    • Alleviate technician workload
    • Reduce customer waiting time

    3. Lower Cost Than OEM Parts

    Original Apple replacement parts remain expensive. Diagnostic-compatible parts provide many of the same user-facing benefits while costing considerably less, making them attractive for:

    • Chain repair shops
    • Distributors
    • Refurbishers
    • Second-hand device dealers

    Hidden Risks You Should Know

    Although diagnostic-compatible parts offer impressive convenience, they’re not a perfect solution. Like any emerging repair technology, there are several limitations worth considering.

    1. Future iOS Updates May Break Compatibility

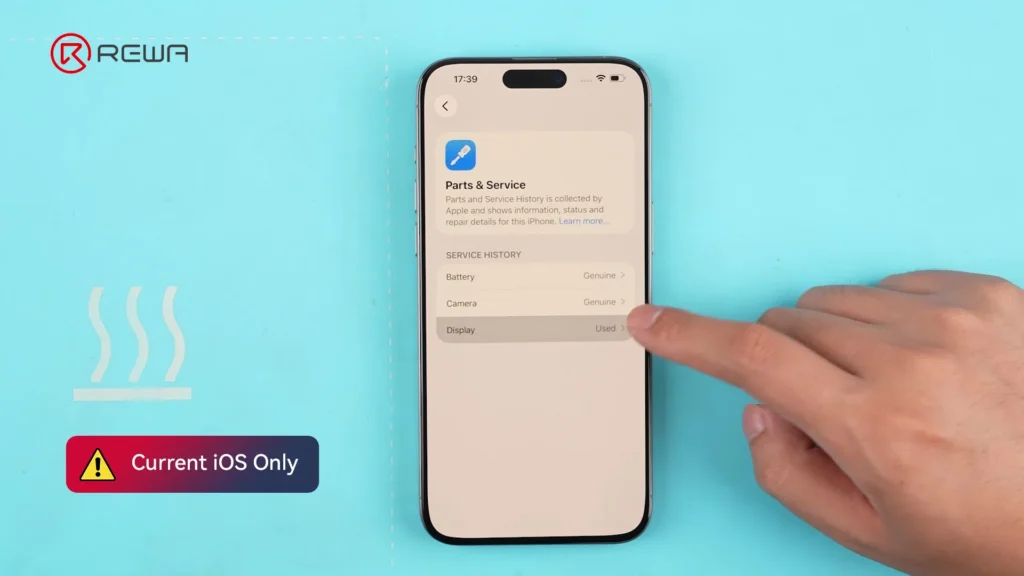
    The diagnostic-compatible parts only guarantee current iOS compatibility. This remains one of the biggest uncertainties.

    iPhone Parts & Service screen showing recognized parts with a warning label stating Current iOS Only

    If Apple changes its verification algorithm in future iOS releases, currently compatible parts could:

    • Fail Apple Repair Assistant
    • Display Unknown Part warnings
    • Lose diagnostic compatibility

    2. Donor IC Chips are Still Used Components

    The authentication ICs are harvested from donor devices. Although genuine, they are not brand-new.

    Older chips may eventually experience aging, instability and random diagnostic failures. Their long-term reliability depends heavily on the quality of the harvested components.

    3. Long-Term Reliability is Still Being Proven

    Manufacturing quality continues to improve, but long-term field performance still requires more validation. Because diagnostic-compatible solutions are still too new.

    Industry testing and early RMA data suggest that some production batches have experienced random glitches, intermittent failures and inconsistent stability.

    Frequently Asked Questions

    1. Can diagnostic-compatible parts permanently remove the iPhone Unknown Part message?

    Not necessarily. They are designed to pass the current version of Apple’s Repair Assistant, but future iOS updates could change Apple’s verification mechanisms and affect compatibility.

    2. Are diagnostic-compatible screens genuine Apple displays?

    No. The display panel itself is aftermarket. However, it typically incorporates an OEM pulled touch IC that enables the authentication process.

    3. Do diagnostic-compatible parts lower the risk of microsoldering?

    Yes. One of the biggest advantages of diagnostic-compatible parts is that they fix the need for complex IC or BMS transplantation during installation.

    4. What is the front sensor flex? Why is it important on iPhone 15 and newer?

    The front sensor flex is the cable that connects components like the ambient light sensor and proximity sensor located near the front camera assembly. And Apple introduced stricter pairing requirements on iPhone 15 and newer. The front sensor flex must either be the original one paired with the motherboard or correctly matched with the replacement screen’s touch IC to complete calibration successfully.

    5. Are diagnostic-compatible batteries as reliable as OEM batteries?

    Reliability depends on manufacturing quality, the condition of the reused authentication IC, and the supplier’s quality control. Because the technology is still relatively new, long-term performance data is still developing.

    6. Who should consider using diagnostic-compatible parts?

    They are well suited for independent repair shops, refurbishing businesses, distributors, and technicians seeking faster repairs, lower labor costs, and a more affordable alternative to OEM parts.

    Conclusion

    Diagnostic-compatible screens and batteries represent one of the biggest developments in the iPhone repair aftermarket in recent years.

    REWA diagnostic-compatible screens next to an iPhone displaying recognized parts in the Parts & Service menu

    By integrating OEM pulled authentication chips into aftermarket components, they make it possible to complete Apple’s Repair Assistant without the complex microsoldering traditionally required for IC chip transplantation.

    As the aftermarket continues to evolve, diagnostic-compatible parts are likely to play an increasingly important role—but choosing products from trusted suppliers with proven quality control remains essential. REWA Technology is a global electronics repair solutions provider, and it implements a rigorous quality control process before shipping each batch of products. If you have any question, please feel free to contact us.

  • What Knowledge Do Repair Shops Need To Be Professional In iPhone Repair?

    What Knowledge Do Repair Shops Need To Be Professional In iPhone Repair?

    iPhone won’t turn on? iPhone stuck on Apple Logo? iPhone keeps restarting? iPhone boot loop? For repair technicians and repair shops, iPhone boot issues are one of the most commonly seen cases in their daily repair work. Facing these common but also tough issues, what you usually start with?

    Yes, we are professional technicians and we know what to begin with. Your intuition may tell you that there might be something wrong with the boot circuit and you can start with the measurement of boot current. However, theoretically, do repair technicians really know how to handle the boot issue in a systematic way instead of simply trust their experience?

    By systematic, below are some principles that repair technicians should all take into consideration when working on iPhone logic board repair.

    Firstly, we should understand the work-flow of different iPhone circuits: how each circuit works; how different circuits cooperate and what they can achieve.

    Secondly, we need to figure out which circuit might be responsible for the issue we are dealing with.

    Lastly, we must master general troubleshooting process of each circuit.

    Sounds complicated? Well, that’s why we bring you this iPhone Circuit Work-flow & Troubleshooting Course.

    iPhone Circuit Work-flow & Troubleshooting Course

    iPhone Circuit Work-flow & Troubleshooting Course

    Course Overview

    This circuit work-flow and troubleshooting course package covers iPhone 6 and iPhone 7. Take this course and you will fully understand the work-flow of different iPhone circuits, figure out possible causes for different issues, and master general troubleshooting process of each circuit. Get trained with this circuit course and learn how to troubleshoot efficiently in your daily repair work.

    Who Should Take The Course

    iPhone repair technicians and enthusiasts who want to fully understand the work-flow of iPhone circuits and master the troubleshooting process of different circuits.

    iPhone repair technicians and enthusiasts who want to fully understand the work-flow of iPhone circuits and master the troubleshooting process of different circuits.

    iPhone 6 Circuit Work-flow And Troubleshooting Process

    Understand the work-flow of iPhone 6 boot circuit, display circuit, backlight circuit, etc..

    Master general troubleshooting process of different circuits.

    iPhone 7 Circuit Work-flow And Troubleshooting Process

    Understand the work-flow of iPhone 7 boot circuit, display circuit, backlight circuit, etc..

    Master general troubleshooting process of different circuits.

    Tips:Please be noted that this course package is renewable. Purchase this course package and you can access all newly-added courses in the package free of charge within the validity period.

    Now let’s get back to the most common boot issues mentioned at the very beginning. What do you know about iPhone boot circuit after handling so many boot issues? The boot circuit can be regarded as logic board trigger circuit. To have the phone turned on, working conditions like power supply, clock signal and reset signal are indispensable. What’s more, CPU has to get key components into power-on self-test process and get the bootstrap imported. Since there are so many components involved in the process, reasons for won’t turn on of the phone can also be various.         ——————How iPhone X Boot Circuit Works

    You can also visit REWA YouTube Channel or REWA Academy to check out the detailed explanation on iPhone X Boot circuit.

    And here are some good news. REWA Academy has taken the decision to share free logic board repair courses on our YouTube Channel(REWA Technology). And we will walk you through the work-flow of iPhone X Boot Circuit.

    And here are some good news. REWA Academy has taken the decision to share free logic board repair courses on our YouTube Channel(REWA Technology). And we will walk you through the work-flow of iPhone X Boot Circuit.

    What boot issues you are most interested in? Please feel free to leave a comment below.For more course information and technical support, please stay tuned to REWA FaceBook Page. Our mentors and account managers are at your service.

    REWA ACADEMY
  • Power On a Wet iPhone – Stop with the Rice!

    Power On a Wet iPhone – Stop with the Rice!

    When talking about a water-damaged device, putting it in rice is just a myth. Rice is unable to pull moisture from inside your device. Check out this video to see what will happen when you try to power on a wet/water-damaged iPhone!

  • Important iPhone Battery Message Removing

    Important iPhone Battery Message Removing

    The annoying “Important Battery Message” of iPhone now can be removed in an effective way.

  • Tips For iPhone 7 Qualcomm No Service Common Issue Troubleshooting

    Tips For iPhone 7 Qualcomm No Service Common Issue Troubleshooting

    Faced with iPhone 7 No Service Issue, repair technicians will troubleshoot from baseband PMU pseudo soldered to baseband CPU shorted. For pseudo soldering problem, we can fix it by re-soldering the baseband PMU. As for the shorted problem, since the baseband CPU cannot be replaced alone, there is no need to proceed with the repair. Here REWA provides a quick solution. So that you won’t waste your time troubleshooting step by step. And ends up with nonrepairable.

  • iPhone X Incoming Calls Not Showing – Fixed By Jumping Wires

    iPhone X Incoming Calls Not Showing – Fixed By Jumping Wires

    Right now, there are few solutions to fix iPhone not responding in sleep mode when getting incoming calls. The general repair process of a repair technician is to take out the motherboard, check PMU and baseband CPU, and then replace or re-solder the faulty component. The whole repair process is complicated and difficult. Check out our video today and REWA LAB will show you a brand new ‘signal borrowing’ solution to fix the problem quickly and efficiently.

    • 00:00 Intro
    • 00:26 Tools & Materials
    • 00:56 Diagnosis
    • 02:37 Confirm the Signal Location
    • 03:27 Borrow Signal by Jumping a wire
    • 05:50 Assemble the Phone and Test
  • iPhone 12 Pro Detailed Teardown Tips For Repair Shop Technicians

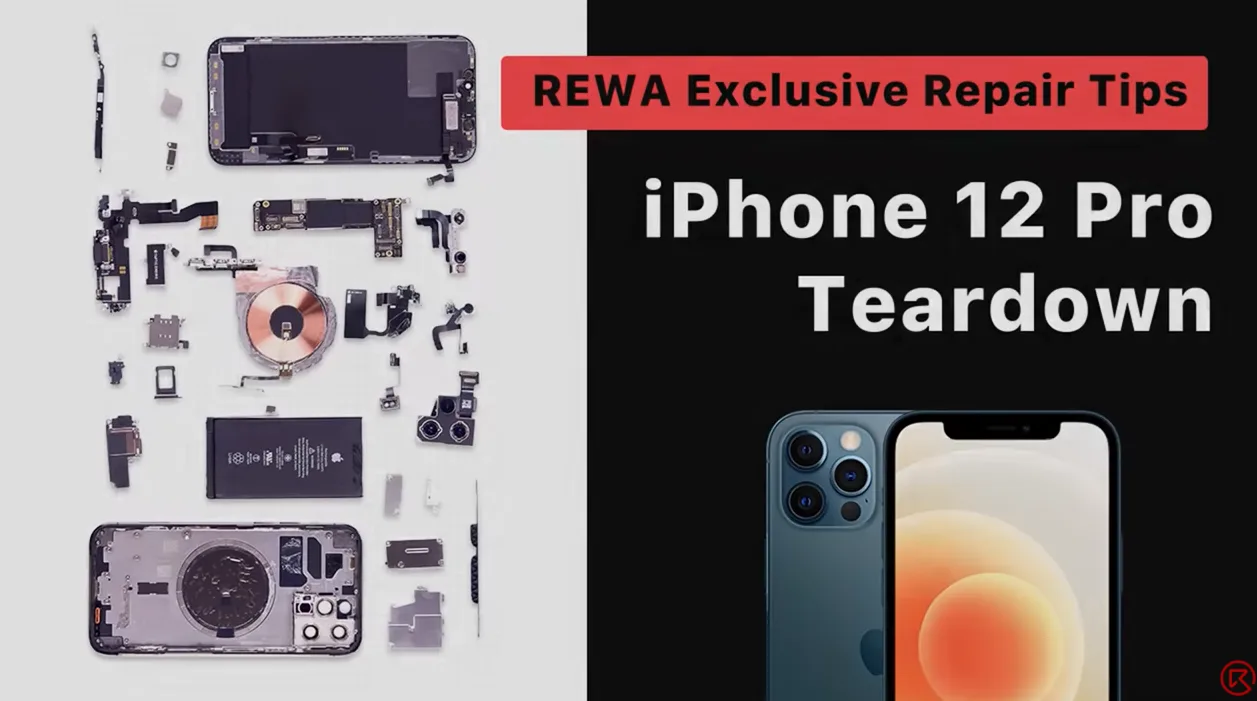
    iPhone 12 Pro Detailed Teardown Tips For Repair Shop Technicians

    Apple’s new iPhone 12 models have been the talk of the town. For repair shop owners, the biggest concern is what to pay attention during disassembly. Today, REWA LAB is going to share a detailed teardown tutorial of the iPhone 12 Pro. Let’s take a look!

    Products recommended in this video:

    • Mobile Phone Disassemble Set
    • REWA SELECTED iPhone 12 Series Accessories:
    • Phone Case
    • Charger Plug
    • Screen Protector
    • Earphone
  • Troubleshooting iPhone XS Max Portrait Mode Not Working

    Troubleshooting iPhone XS Max Portrait Mode Not Working

    Many iPhone XS Max users have the complaint that the Portrait Mode on their phones is not working. And it’s not a strange thing to see that questions like ‘Why does my iPhone XS Max Portrait Mode not working’ and ‘How to fix my iPhone XS Max Portrait Mode not working’ have been so frequently searched on Google. If you are one of them, this article will help you to solve this issue. Here REWA is going to tell you how to fix Portrait Mode not working on iPhone XS Max.

    Usually, there are two different causes for Portrait Mode not working on iPhone XS Max. Software problems or hardware problems. Here we have some solutions for software problems.

    Note: Don’t use portrait mode in dark places or low light. Because portrait mode will not work in low light. And make sure that the distance between the phone and the subject is proper(neither too far nor too close). Keep at least 19 inches distance between the phone and the subject.

    1. Restart your iPhone XS Max or camera app. 2. Upgrading iOS: Go to Set->General->Software Update. 3. Reset all settings: Go to Set->General->Reset-> Reset All Settings. 4. Restore your iPhone XS Max to Factory Settings(Factory Reset): Go to Settings->General->Reset-> Erase All Contents and Settings. Take a backup before resetting your iPhone to Factory Settings, since this action will erase all data from your device.

    So, these are some methods to resolve the iPhone XS Max portrait mode not working issue. You can try them out. However, if nothing works, the possible situation is that the motherboard or the camera has been damaged. In this case, you need to have the damaged one replaced. Well, you can also follow our solution below.

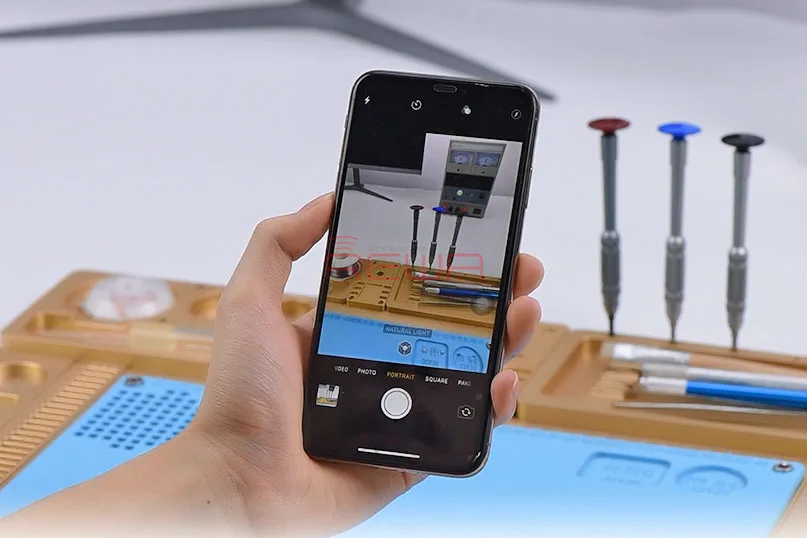
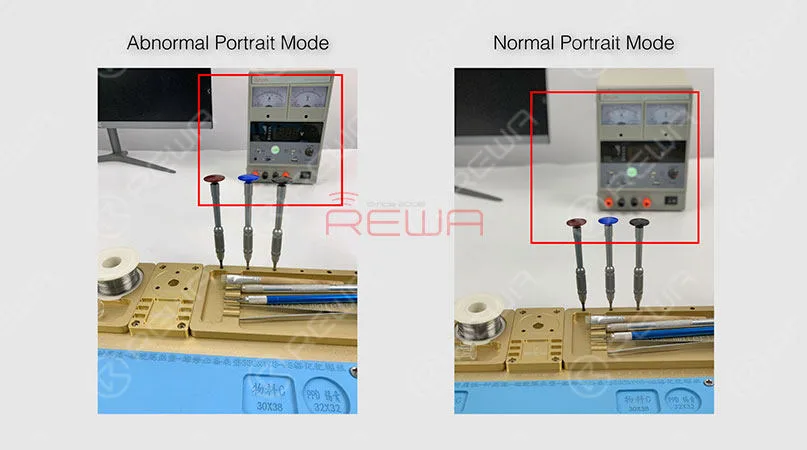
    The first thing we do is to check if the Portrait Mode is in a normal status. Open the camera app and swipe to portrait mode. We can see clearly that the background is not blurred. Which indicates that the wide-angle lens is working normally, while the telephoto lens is not working at all.

    iPhone XS Max Portrait Mode Not Working Troubleshooting

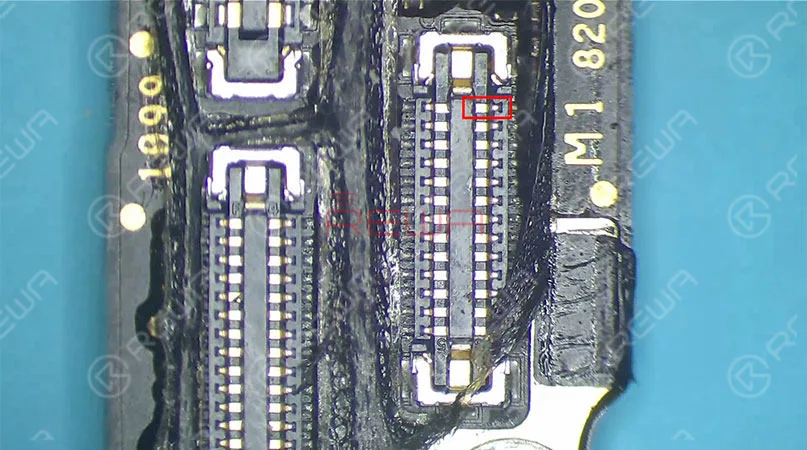
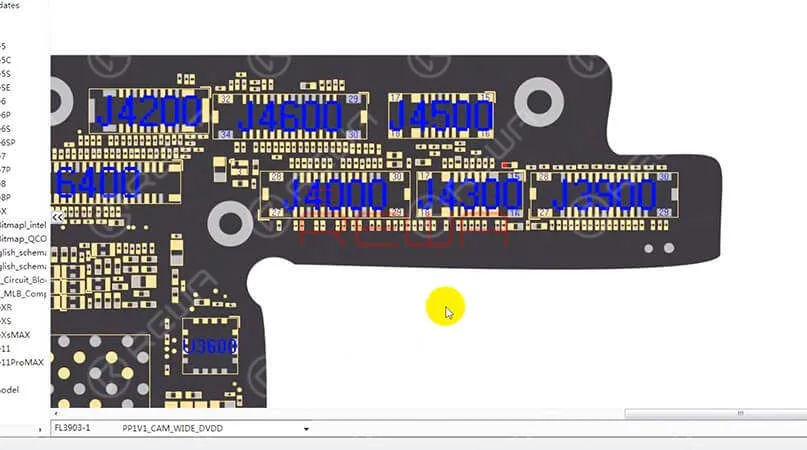
    Take apart the phone and take out the motherboard. Run diode mode measurement of the Tele camera connector J4000. The measured value of Pin 25 is OL, which is abnormal. Which also indicates that Pin 25 relevant circuit has open-circuited(The circuit is formed by a zero-ohm resistor R4006, several capacitors and the camera power supply IC U3700). Since capacitors have nothing to do with the open-circuited condition. So the first thing we do is to check the zero-ohm resistor R4006. Run diode mode measurement of R4006. Judging by the measured value, R4006 has not open-circuited. We can confirm that the fault is probably related to U3700.

    iPhone XS Max Portrait Mode Not Working Troubleshooting

    Try to replace with a new camera power supply IC. You need to separate the upper and the lower layer first. And then detach U3700. Continue to clean the bonding pad and solder a new camera power supply IC. Solder the two layers together later. Detailed steps go as follows:

    iPhone XS Max Portrait Mode Not Working Troubleshooting

    Place the motherboard on the Heating Platform. This machine can quickly desolder & resolder iPhone XS Max double-layer motherboard. It offers heat evenly that can protect the motherboard from damage. With accurate temperature control and temperature adjustment, it is highly recommended for motherboard repair. Pick up the upper layer with tweezers once solder on the third space PCB has melted, and detach U3700 from the board with Hot Air Gun.

    iPhone XS Max Portrait Mode Not Working Troubleshooting

    Apply solder to clean the bonding pad first. Then clean thoroughly with rosin soaked Solder Wick. Clean with PCB Cleaner afterwards. Get a new camera power supply IC in position and solder with Hot Air Gun. Next thing we need to do is to solder the two layers together. Clean the third space PCB with rosin soaked solder wick first, then reball the lower layer. Solidify the third space PCB with Paste Flux afterwards. Once done, apply some BGA Paste Flux to the third space PCB. Get the upper layer and the lower layer in position. Use the iPhone XS Max Motherboard Soldering/Desoldering Rework Station to solder the double-layer motherboard.

    iPhone XS Max Portrait Mode Not Working Troubleshooting

    Once we have confirmed that the motherboard has been soldered successfully, we can assemble the phone and test. Warm tips: get the phone full assembled after confirmation of fault clearance. Get the motherboard and display assembly installed. Connect the battery and press the power button. The iPhone XS Max turns on normally. Open the camera app and swipe to Portrait Mode. We can see that the subject is being focused and the background is blurred. The Portrait mode not working on iPhone XS Max issue has been solved successfully.

    iPhone XS Max Portrait Mode Not Working Troubleshooting

    PLUS:  with our unique teaching system, REWA offline training course can help technicians improve their repair skills by mastering repair thoughts and repair techniques.

    Tools used:

    iPhone XS Max Motherboard Soldering/Desoldering Rework Station

    Explosion-Proof PCB holder for iPhone XS/XS Max

    Hot Air Gun Rework Station – 990AD

    Soldering Iron Rework Station – 969A

    Electron Microscope – Type 1

    Digital Multimeter

    LCD Opening Pliers

    Solder Wick

    Rosin Soldering Flux

    Straight Tweezer

    Curved Hook Tweezer

    Screwdriver

    Soft Brush

    Anti-static Plastic Pry Bar

    Stainless Steel BGA Scraper

  • How to Fix iPhone X Camera Not Working Issues – Logic Board Repair

    How to Fix iPhone X Camera Not Working Issues – Logic Board Repair

    The iPhone has a very precise motherboard. Once the phone falls, it is easy to affect the shooting function. Today, REWA LAB will show you how to solve the camera not working problems on iPhone X.

    Cosmetic Inspection

    First, run cosmetic inspection. The board hasn’t been water damaged or dropped.

    First, run cosmetic inspection. The board hasn’t been water damaged or dropped.

    Test & Assemble

    Second, get the motherboard installed and test. Get a known good iPhone X back glass assembly then get the motherboard well installed. Connect the power flex cable, the charging port flex cable, cameras, etc..

    Key Tips: It’s necesarry to connect the earpiece speaker and sensor flex cable. Otherwise the screen will dim after booting up.

    Second, get the motherboard installed and test.

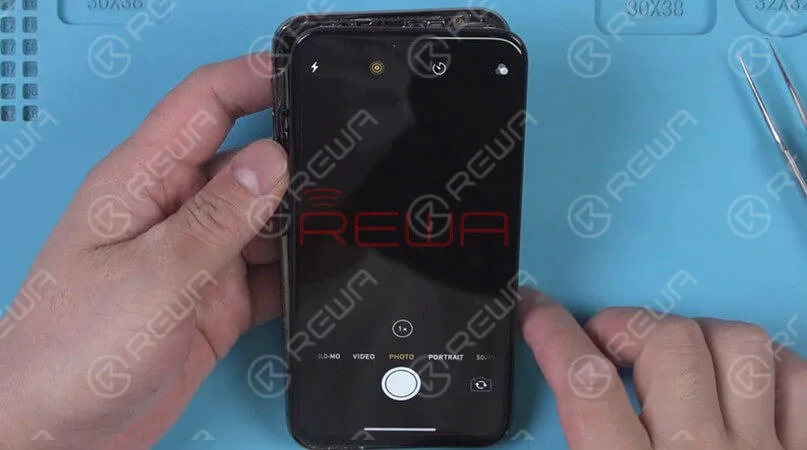
    After finish the assemble, turn on the phone. Tap ‘Camera’ icon and enter into camera mode. We can find that the front camera and the rear camera can not be activated. What’s more, the flashlight also can not be activated also. Judging from this, we need to focus on the rear camera circuit.

    Diagnosis

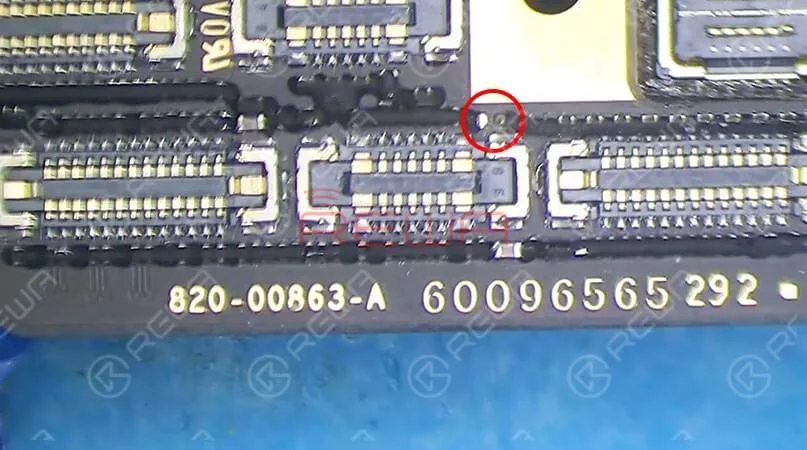
    For better inspection, tear off sponge around connectors first. Then we should check the motherboard under the microscope. We can find that one component next to the power flex cable has fallen off the board.

    Let’s attach the motherboard to the PCB Holder. For better inspection, tear off sponge around connectors first. Then we should check the motherboard under the microscope. We can find that one component next to the power flex cable has fallen off the board.

    Our guess is that due to improper operation, the component was pried off when the power flex cable was disconnected by the unknown repairman. Beside, the bonding pad has also been pried off the board.

     Next we need to open the point map and find the relevant component information. Here we recommend using REFOX. A concise and smooth bitmap software that provides reliable schematics and board files for Apple/Samsung/Huawei (so far) motherboard repair.

    Next we need to open the point map and find the relevant component information. Here we recommend using REFOX. A concise and smooth bitmap software that provides reliable schematics and board files for Apple/Samsung/Huawei (so far) motherboard repair.

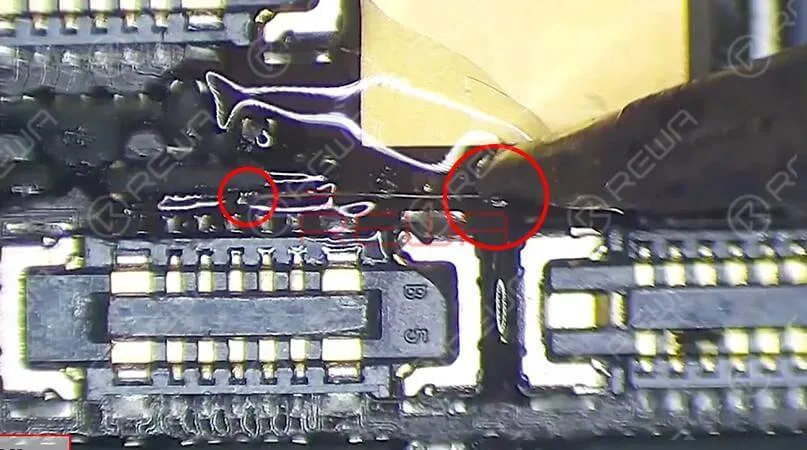
    The missing component is inductor FL3903 which is the protective inductor on the 1V1 power supply line of the rear camera. Since the bonding pad has also fallen off the board, we need to connect Pin 1 of FL3903 with Pin 1 of C3928 by jumping wire.

    Jump Wire

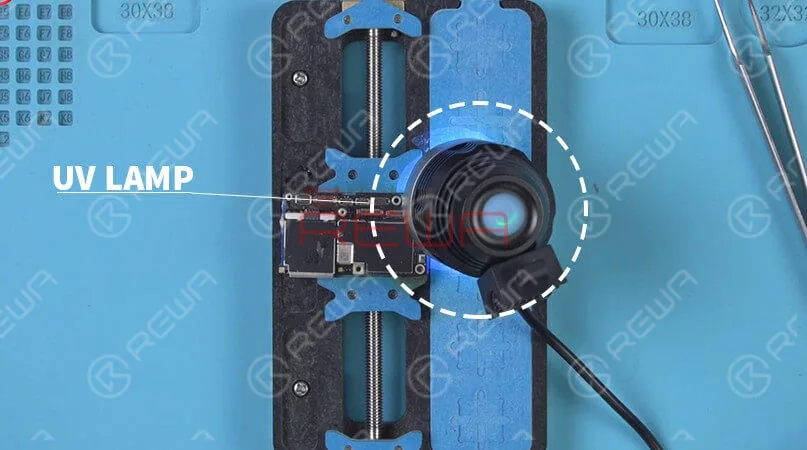
    Jumping a wire between the two pins with Soldering Iron.

    Solidify the board under UV Dryer Lamp for 5 minutes.

    Here are the specific steps:

    Assemble & Test

    assemble the phone and test

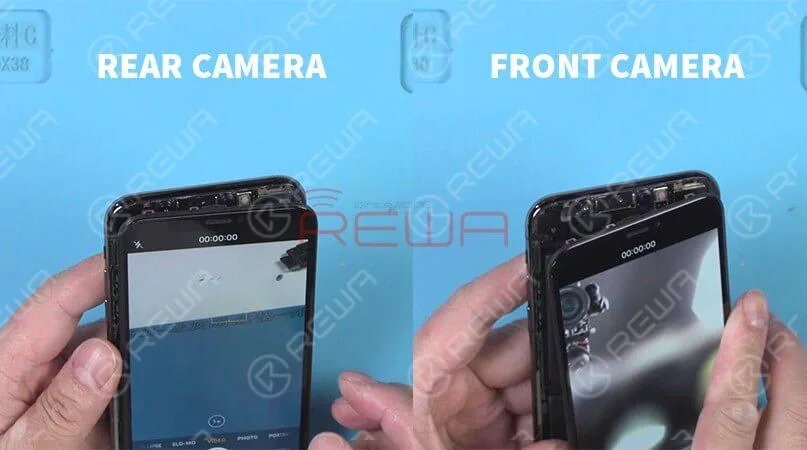
    Finally, we can assemble the phone and test. Tap ‘Camera’ icon and enter into camera mode. The front camera and the rear camera work normally.

    Warm tips: get the phone full assembled after confirmation of fault clearance.

    REWA academy

    If you’re interested in learning more about cell phone repair, you can visit REWA Academy. They offer free courses, video tutorials, and other resources to help you acquire the skills required to become a successful cell phone repair technician. Additionally, you may contact REWA Academy to schedule a free consultation or to inquire about cell phone repair.

    For more details on the repair operation, click on the video below:

  • iPhone Repairs Could Become Much Cheaper Thanks To These REWA Laser Machines

    iPhone Repairs Could Become Much Cheaper Thanks To These REWA Laser Machines

    It’s always been expensive to repair a broken Phone, but the last couple of years, official prices have really soared into ludicrous territory. Replacing a broken screen on the iPhone XS Max or iPhone 11 Pro Max, for instance, will cost you $329 if you don’t have AppleCare+. Somewhat ironically, it costs even more to replace the back glass of an iPhone – up to $600 according to Apple. At that point, you might as well buy a new phone – which may very well be what Apple wants.

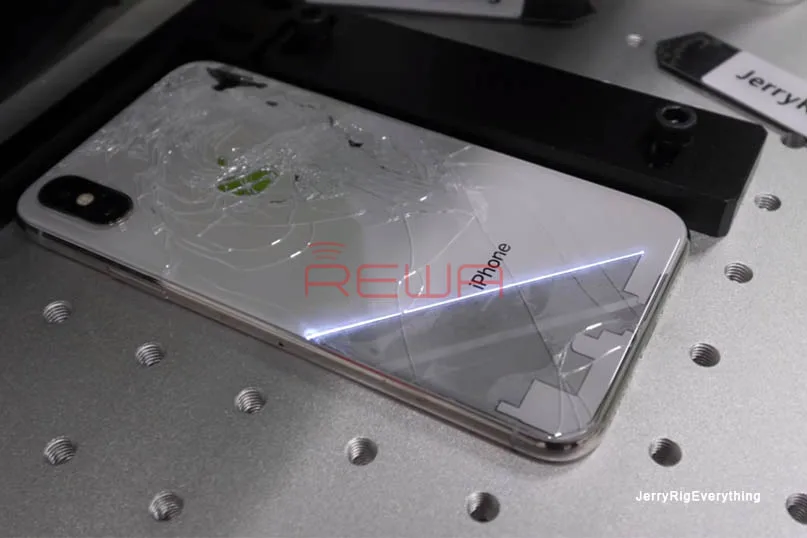
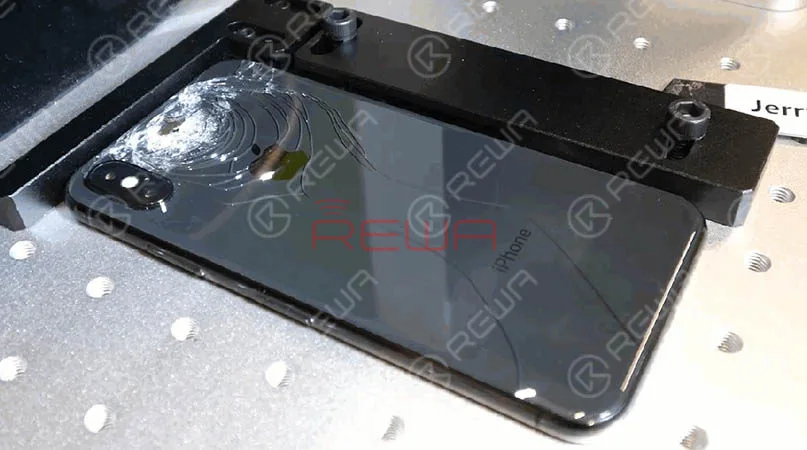
    But it doesn’t have to be this way. As shown by YouTuber JerryRigEverything (real name Zack Nelson), replacing the back glass of a new iPhone can be a relatively inexpensive affair… if you have a big ole’ rewa laser machine to help you.

    See, Apple began using a permanent adhesive on the back of its phones with the iPhone X. This makes removing shattered glass much more difficult than on the typical phone, with which a basic heat gun is enough to soften the adhesive and remove the glass with a pry tool. So instead, repairs actually replace the entire rear housing. That’s why it costs so darn much.

    As it turns out, however, there are actually machines designed specifically for removing the back glass off phones using lasers. Nelson is using a $2,041 machine from REWA. There are several such machines on the market, but they all work essentially the same way: a high-powered beam is able to literally burn off the adhesive under the back panel, while being precise enough to not damage other components. The process also happens to burn off the coloring under the glass, but it looks awesome doing it.

    As it turns out, however, there are actually machines designed specifically for removing the back glass off phones using lasers. Nelson is using a $2,041 machine from REWA. There are several such machines on the market, but they all work essentially the same way: a high-powered beam is able to literally burn off the adhesive under the back panel, while being precise enough to not damage other components. The process also happens to burn off the coloring under the glass, but it looks awesome doing it.

    Once thoroughly pew-pew’d, the back glass is much easier to remove with a pry tool. It’ll still take some time, especially if your phone is thoroughly cracked (cracked glass diffuses and weakens the laser beam), but it’s definitely doable for a trained repair person. Then simply apply some adhesive and a new back, and voila – you have a new-looking iPhone.

    There are some caveats. For one, finding replacement back glass with the Apple logo is difficult, so you might have to go with an unbranded look. Some will think you might as well go with the skin at that point. For another, it probably doesn’t make sense for an individual to buy a $2,000 machine to fix an individual phone.

    But most people aren’t going to replace their own iPhone backs anyway. Instead, it seems like a no-brainer investment for small repair shops looking to provide a more affordable alternative to Apple’s solution. This is doubly true as it works for just about any other glass-back smartphone as well – you simply need to select the right preset on the machine.

    Check out Nelson’s video for more, it’s worth it for the lasers:

    And here’s another video from REWA laser machine that goes a bit more in-depth about the process:

    Hopefully it won’t be so expensive to repair your shiny new iPhone at a local shop one day. Source & Image From thenextweb.com.

  • Is iPhone Screen Repair Too Expensive?

    Is iPhone Screen Repair Too Expensive?

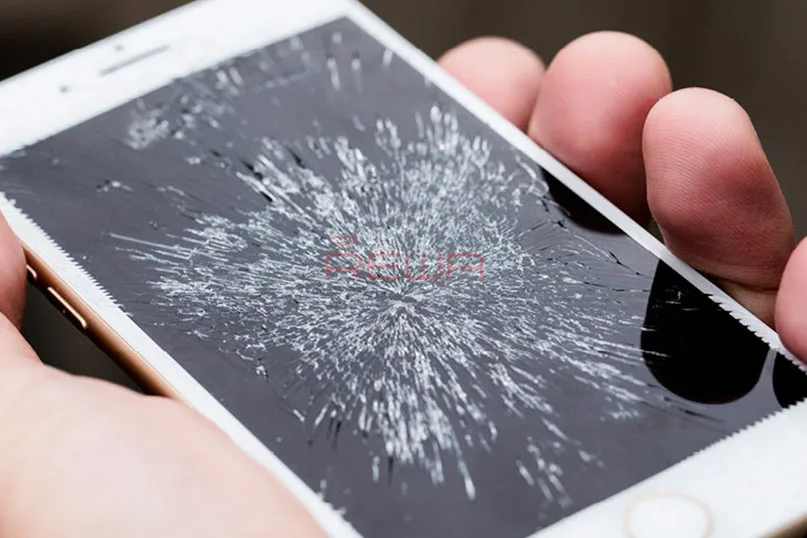
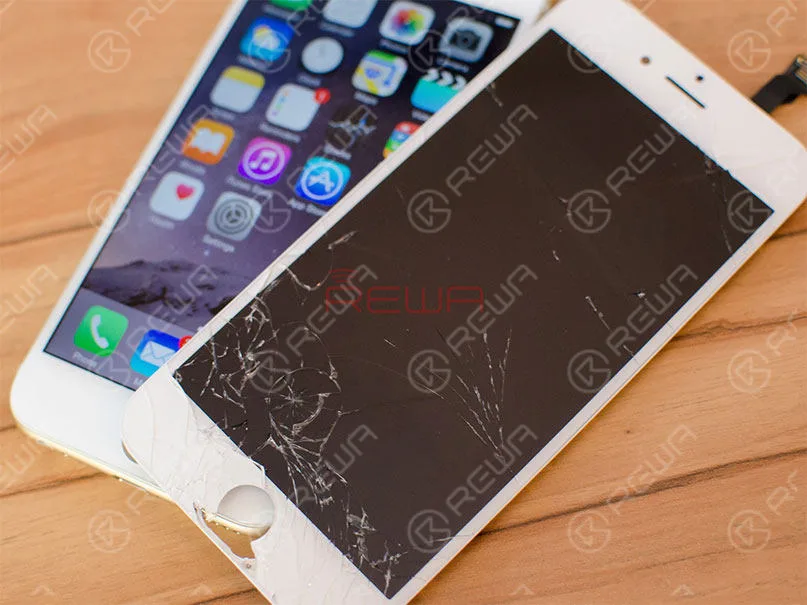
    You just dropped your iPhone and the cracks appeared on your screen. How ubiquitous these kinds of scenes are. While you have no choice but face the reality. The case should be more complicated when you do not have any insurance covered, because you will get an eye-watering price if you turn to Apple official support.

    Given that the smart phone has already gone into a mature stage, you would have thought the price of display would have gone done with time. However, The price of iPhone LCD screen digitizer has been persistently high.

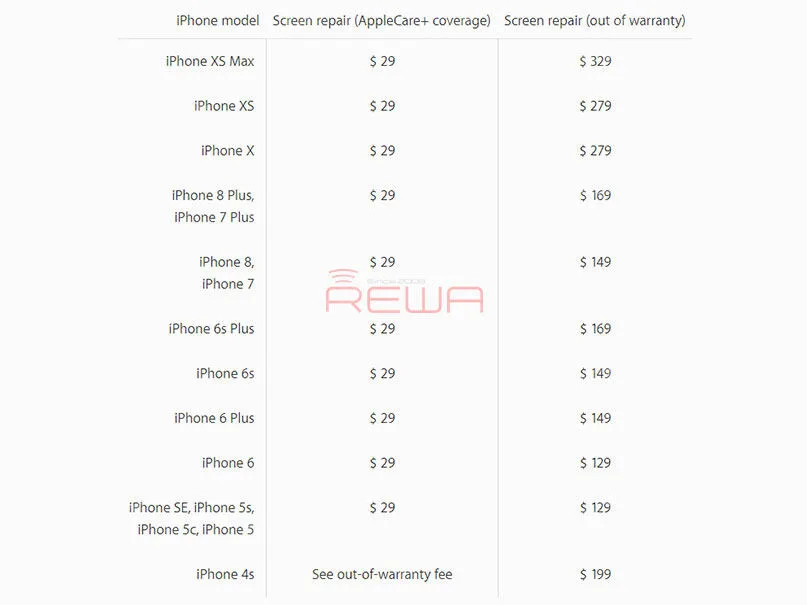
    Let’s check the Apple official quotes for reference to see how much you will cost for your broken screen.

    iPhone Screen Repair Too Expensive

    Apple official Quotes for Screen Repair[/caption] If you have Apple Care+(with additional repair coverage and technical support) and within the coverage, you only have to pay $29 to save your cracked iPhone screen. A couple of years after purchasing, you have to shell out full fund to get it repaired. From the official data, we can see that it takes $329 to repair a broken iPhone Xs Max screen when it is out of warranty. Worse still, Apple will charge you extra repair fee if there are any physical damages, and this seems to be often.

    Therefore, how to get your cracked phone repaired at a more reasonable price? Third party repair shop is a good choice. Since iPhone is so popular and many third party repair stores can offer relative replacements or iPhone glass only repair services. Compared with Apple official, these repair stores offer you a various choice from general to a high level both in quality and price, and you can also get OEM parts and components. Whereas, there are still some small barriers, for instance, Apple disabled true-tone function after screen replacement by third-party repair shops.

    iPhone Screen Repair Too Expensive

    To some degree, repair services from the third party are more convenient and faster. It’s unworthy to afford a pretty penny and tired to wait for a long time to get back your iPhone screen. While, still, third party repair will void your Apple warranty. If you definitely mind the warranty or have some concerns, it would be better to turn to Apple Service Center. For solution from the third party, it is critically important to choose a reliable and reputable repair store.

    How would you like to get your broken screen repaired? Do you prefer reviving your iPhone with Apple Service Center with official support in a high price or taking it to a third party repair shop for a cost-effective service? Share us your ideas.